createuser spotfire_joindb with password 'spotfire' nocreatedb;
create database spotfire_joindb;
alter database spotfire_joindb owner to spotfire_joindb;
mkdir -p parent/son
mkdir -m 711 xxx
move/rename folder:
mv folderName newFolderName
check memory state:
cat /proc/meminfocheck cpu information:
lscpu | egrep 'Model name|Socket|Thread|NUMA|CPU\(s\)'
show current time:
date +%Y/%m/%ddate +%H:%Mdate '+%F'datepoweroff Linux:
/sbin/shutdown -h now1 min later:
/sbin/shutdown -h 1
/sbin/shutdown -h 10:33
cancel it:shutdown -creboot now:
reboot/sbin/shutdown -r nowusers' home folder is located in:
~ means /home/xxx
but root's home is in /root
file with .prefix can be a hidden file.
eg: .bash_profile
open GNOME,KDE,TWM:
startx
logout: exit(ctrl+d)
check calendar:
cal 06 2021
calculator:
bc
echo "1+35" | bcscale=number, number after the decimal point
quit to exit
get help:
--help or --h
show the manual:
eg:man date
open text editor:
nano text.txt
check who login: who
check who login: w
net state: netstat -a
the program runs: ps -aux
change to be root identity:su -
change to another identity:eg: su - nodemanagerCreate a sudo user in CentOSaccount information:/etc/passwdpassword information:/etc/shadowgroup information:/etc/group
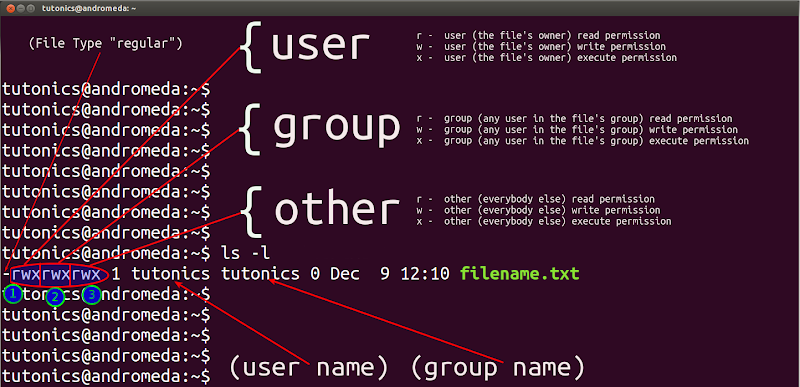
File Permission:
https://tutonics.com/2012/12/linux-file-permissions-chmod-umask.html
d is for folder, – is for file, | is for link file, b is for equipment, c is for I/O equipment.
r:4, w:2,x:1
for folders, who only has read permission if there is no x(execute), like r– cannot access the folder.x let you can access the folder, like when using cd xxx command.
for files, w permission enable you change the content, but cannot delete the file.
change the system language:
/etc/locale.conf
change the group the files belonged to, the group must in /etc/group: chgrp
eg: chgrp groupname xxx.txt
change the owner of the files, the owner must in /etc/passwd: chown-R will influence the sub folders and files
eg: chown -R ownername xxx.txt
change owner and group:
eg: chown ownername:gourpname xxx.txt
copy a file: cp
-i if there is the same one exists, system will ask your confirmation
cp -i sourcefile destination
-a make it totally the same including the permission information
-s make a shortcut
-u update the destination with newer file.
-d copy shortcut to shortcut
-l copy shortcut’s content(real one, not itself, can be neglected)
change the permission: chmod
eg: chmod -R 777 xxx.txt
some useful permission, for example:
-rwxr—–: chmod 740 filename
-rwxr-xr-x: chmod 755 filename
chmod u=rwx,go=rx filename
chmod u=rwx,g=rx,o=r filename
add all(u,g,o) writing permission:
chmoda+w filename
cancel all execute permission:
chmoda-x filename
create a new file:
touch xxx
delete file(-r includes every son):
rm -r xxx
read and show in command line(-n show line number):
eg: cat -n ~/.bashrc
show from tailto start:
eg: tac ~/.bashrc
show with line number:
nl -b a -n rz 1.txt
delete an empty folder(-p includes every parent empty folder):
rmdir -p xx/xx
go to home folder:
cd = cd~
back to the folder just now:
cd -
print environment path variable to screen:
echo $PATH
add a folder to PATH:
PATH="${PATH}:/root"
get basename:
basename /etc/sysconfig/network
get dirname:
dirname /etc/sysconfig/network
print content to search:
more 1.txt
less 1.txt
use /key word and ?keyword to search after and before, n to repeat the action, pageup and pagedown to turn pages, G go to the last line, g go to the first line, q quit less.
revert less:
tac xxx.csv | less
show head 100 line:
head -n 100 1.txt
excludes the last 100 line:
head -n-100 1.txt
show tail 100 line:
tail -n 100 1.txt
excludes the first 100 line:
tail -n+100 1.txt
show if there is new data input:
tail -f 1.txt
show 11 line to 20 line:
head -n 20 1.txt |tail -n 10
meanwhile show the correct line number:
cat -n 1.txt | head -n 20 | tail -n 10
show the different character code result:
eg: od -t oCc 1.txt
eg: echo testword | od -t oCc
show the mtime(content modifying time) of the files:
ll
show the atime(access time) of the files:
ll --time=atime
show the ctime(change time, state of files, cannot be changed) of the files:
ll --time=ctime
create a new file with a certain mtime:
touch -t 202107041412 xxx.txt
default permission setting:
umask
umask -S
umask means needs to deduct from the max permission:
eg: for folders: 777(drwxrwxrwx) – umask number
for files: 666(-rw-rw-rw-) – umask number
change umask default number:
umask 002
show the hide attributes(-a, -d, -R):
lsattr xxx
change the hide attributes(+a, +i, -a, -i):
chattr +a xxx
SUID(4, u+s): special permission on execution file to make the executioner having owner permission in run-time.
-rwsr-xr-x
if s is S, that means as there is no x, it is meaningless
SGID (2, g+s) : special permission on file/folder to make the executioner having group permission in run-time.
SBIT (1, o+t) : special permission on folder to make only the root and owner can delete the sub folders or files.
to add suid, sgid, sbit, the method like below:
chmod 4755 filename
chmod g+s, o+t filename
get detailed information of file:
file xxx.rpm
search a command file(-a means not the first result, show all):
which -a command
check command installed or not:
eg: command -v sshfs
search a file(-l: list the folder will be checked, -b: only check binary file, -m: only check the file in manual path, -s: only check source file, -u: look for others file):
whereis -l filename
locate/updatedb:
-i(Case insensitive): locate-i partfilename
-c(output only the found number): locate -c partfilename
-l(output line number): locate -l 5 partfilename
-S(output db related information): locate -S partfilename
-r(show regex format): locate -r partfilename
updatedb can get the newest result.
find -mtime n:
find files >= 5days ago: find /var -mtime+4
find files <= 4days ago: find /var -mtime-4
find files 4-5days ago:find /var -mtime 4
-user, -group, -nouser, -nogroup
find the files under a folder which is belonged to a user: eg:
eg: find /home -user username
find a file having keyword:
eg: sudo find / -name "*xxx*"
eg: find / -name *.txt
find the number of a certain type:
find ./*.JPG -type f | wc -l
find a certain type file(s:socket, b,c: equipment, f:file, d: folder, l:link, p: FIFO):
eg:find /run -type s
eg: +, \; means finish
find ./ -type f -name mem* -exec cat {} +
find ./ -type f -name mem* -exec cat {} \;
find file with special permission:
eg: find / -perm /7000
find file size over 1M:
eg: find ./ -size +1M
eg: add -exec ls -l {} \; at last if continue to do some action
physical disk file: /dev/sd[a-p][1-128]
eg: /dev/sda1
virtual disk file: /dev/vd[a-d][1-128]
ext2 is indexed allocation
check the disk volume where a certain folder in(-i: show inode):
eg: df -hT ./
except tmpfs Filesystem, e.g: df -hT -x tmpfs
eg: xfs_quota -x -c "df-h" /home
/dev/shm/ is the folder using memory, usually volume is half of the memory
check the folder size:
eg: du -Sah ./
check all the 1st subfolders and files size(c is for summary):
sudo du -hsc ./*
list sorted results of the big 30:
sudodu -ahx ./ | sort -rh | head -n 30
check the folder size with n depth:
sudodu -h --max-depth n ./
similar to hard copy(-f: force): ln fileNameshortcutName
similar to soft copy, making link (-f: force) : ln -s fileName shortcutName
eg: sudo mount --bind /home/userName/mountTest /home/userName/SImA/SImA-1.1.10/migration
unmount a device(-f: force):
eg: umount /run/media/user/U
change the xfs disk’s label(-l is to show, -u is to show UUID, -U is to use UUID):
eg: xfs_admin -L labelname /dev/sdb4
generate a new UUID: uuidgen
to change uuid and label for ext4, use tune2fs, eg: tune2fs -L labelname /dev/sdb4
to mount automatically, change the content in:
/etc/fstab
to mount dvd.iso files:
eg: mount -o loop /tmp/xxx.iso /data/xxx
to mount a big file: eg: mount -o loop UUID=”xxx“ /mnt
check free memory in detail: free -h
total memory: grep MemTotal /proc/meminfo
check swap equipment in detail: swapon -s
grep SwapTotal /proc/meminfo
.zip file unzip:
unzip-P password xxx.zip -d ./targetFolder/
check the content in zip file:
unzip -l xxx.zip
zip a file(-v show the detail information, -d unzip, -1: quick but lower compressed, -9: slow but well compressed, default is 6, -c: show to screen and can be redirected):
eg: gzip -v textfile
eg: gzip -d testfile.gz
eg: gzip -9 -c xxx > xxx.gz
unzip img.gz:
gunzip xxx.img.gz
show the zip file’s content:
eg: zcat xxx.gz
find the content in zipped file:
eg: zgrep -n ‘anycontent‘ xxx.gz
bzip2(-k is to remain the original one) is more compressed than gzip, command is almost the same.
eg: bzip2 filename
show the zip file’s content:
eg: bzcat filename.bz2
xz(-v show detailed information, -k remain the oringal one) is more compressed than bzip2
eg: xz filename
show the zip file’s content:
eg: xzcat filename.xz
unzip tgz file:
eg: tar zxvf xxx.tgz
use tar(-j for bz2, -J for xz, -z for gz, -p keep ther original permission, –exclude= for excluding unwanted one) to make zip folder:
tar -jcv -f filename.tar.bz2 object_folder1 object_folder2
to check what is inside:
tar -jtv -f -filename.tar.bz2
to unzip:
tar -jxv -f filename.tar.bz2 -C destination_folder
to unzip one in the zipped file:
tar -jxv -f filenme.tar.bz2 thatFile
to unzip .tar.gz file: eg:
tar -xvzf shga_sample_750k.tar.gz
to unzip tar.xz file:
tar xf linux-3.12.2.tar.xz
to unzip .tar file, eg:
tar -xvf xxx.tar-C ./
view the contents of tar.gz:
tar-tf filename.tar.gz
back up xfs file system(level 0 means totall backup):
throw the content: eg: find /home -name .bashrc 2> /dev/null
stdin from the file: eg: cat > catfile < ~/.bashrc
define the end symbol: eg: cat > file << “eof“
if cmd1 pass, then do cmd2: cmd1 && cmd2
if cmd1 fail, then do cmd2: cmd1 || cmd2
to select by command1’s result: command1 && command2 || command3
get a certain command from a line(here 3 is the third one, 5 is the fifth one, c means choose by character):
eg: echo ${PATH} | cut -d‘:‘ -f 3,5
eg: echo ${PATH} | cut -c 3-5
select keywords content out(-a: check binary file by text, -c: count found words, -i: ignore case, -n: with line number, -v: opposite selection, –color=auto: show with color):
eg: last | grep-v‘reboot‘
sort the result(default sort by the first column, -k 2: sort by 2nd column, -n: sort by number, -M: sort by month, -f: ignore case, -b: ignore first space, -r: reversed order, -t: separation symbol, -u: if same just show one):
eg: last | sort -k 2
select out repeated data(-c: count, -i: ignore case):
eg: last | cut -d ‘ ‘ -f 1 | sort | uniq -c
how many lines, words, chracters in the content:
eg: cat /etc/passwd | wc -lwm
save while output(-a: add to the end of the original destination file):
eg: ls -l / | tee -a ~/homefile | more
replace words(-d: delete the words, -s: no repeated words): eg(a -> A): last | tr‘[a-z]‘‘[A-Z]‘
replace tab by space: eg: cat /etc/man_db.conf | col -x | cat -A | more
replace tab by several spaces(-t: space number): eg: xxx | expand -t 6 filename
simple join two file, default by tab(-d: default join symbol is tab): eg: paste file1 file2
split files(-b: unit size, like 1b,1kb,1mb, -l: line number): eg: split -b 300k filename prefixName
recover from split files: eg: cat prefixFile* >> finalFile
use for command can’t use pipe(-0: set for special separation symbol, -e: set for EOF, -p: need confirmation each time, -n: how many parameters each time it needs): eg: find /usr/sbin -perm /7000 |xargs ls -l
check user’s UID/GID information: eg: id root
check content lines in the file(-A: includes lines after, -B: includes lines before):
eg: dmesg | grep -n -A3 -B2 --color=auto'memory'
check the kernel information: dmesg
select by regular express(3,$d means from 3 until last line delete): eg: nl regular_express.txt | sed'3,$d'
replace by several lines(line 2-5 are replaced by xxx):
eg: nl regular_express.txt | sed'2,5c xxx'
select out several lines(line 2-5 are selected):
eg: nl regular_express.txt | sed -n'2,5p'
insert content into lines(xxx is inserted after line2):
eg: nl regular_express.txt | sed '2a xxx'
insert content into lines(xxx is inserted before line2):
eg: nl regular_express.txt | sed '2i xxx'
to replace some words(-i: sed -i… means directly change on that file and save automatically):
eg: filecontent | sed 's/wordsNeedToBeReplaced/newWords/g'
find all files containing specific text in a folder:
grep -rnw './' -e'searchPattern'
egrep means grep -E, can use advanced regular express, eg: egrep -v ‘^$|^#’ regular_express.txt
extract content by column(the eg is 1 and 4 col, NF: how many column it has, NR: current row, FS: separation symbol): eg: who | awk '{print $1,$4}'
securely delete files, directories, and block devices by overwriting their contents with random data(overwriting its contents 3 times with random data. The -v option will display progress information, and the -z option will perform a final overwrite with zeroes to hide the fact that the device was shredded.): eg:
sudo systemctl enable --now NetworkManager

# List all available Wi-Fi networks in the area.
nmcli dev wifi list

# Connect to a specified Wi-Fi network using its SSID and password.
nmcli dev wifi connect <SSID> password <password>

# Display a list of all active network connections, showing their status and other details.
nmcli con show

# Disconnect the specified network interface from its network.
nmcli dev disconnect iface <interface_name>
paste the whl files folder named python to the path C:\temp(in req.txt named the main modules you want to install), and go to the python.exe directory which you want to install on:
the upgrade tool UIconfig which locates in tibco\tss\10.10.0\tools\upgrade, may sometimes need:
Vc_redist.x64.exe and Vc_redist.x86.exe
XML View tab in configuration tool shows all the configuration, and open it by the path:
tibco\tss\7.9.0\tomcat\spotfire-bin\uiconfig.bat
after upgrading, the data functions need to be trusted, use the command below(if memory is not enough, using single thread, befor auto and single, it’s 2 -):
you can check the trust and untrust scripts, report in tibco\tss\10.3.10\tomcat\spotfire-bin\find-analysis-scripts>
to keep the weplayer’s language same with the visitor’s language:
tibco\tss\10.3.10\tomcat\webapps\spotfire\WEB-INF> copy ResourcesHeader.properties and ResourcesWeb.properties, and then rename it and add ‘_en_US‘ at last
need to configure the configuration tab->join database in configuration tool after configuring the upgrade tool
ChemDraw-JS-Setup-18.1.1.exe for only 1, JS includes the ChemDraw ActiveX ChemDraw ActiveX Enterprise Constant.zip for 2 more, and it is a must for the webplayer server. Must reinstall the CDAX manually if it is also used as a webplayer server meanwhile.
spotfire_webclipboard_setup.exe needs to transfer the installed content to the right folder like tibco\tss\10.3.10\tomcat\webapps\ROOT\webclipboard, you need to check the version in the path is correct or not
by command prompt, in path: \tibco\tss\10.3.10\tomcat\spotfire-bin>config enable-user --username=ANONYMOUS\guest
let anonymous user (a subgroup)in a certain group having spotfire consumer licences
making a folder in library, let anonymous user access possible
to deal with the problem that two different version installed in same server, the node manager may use the old one(basically step 3 and 4 is enough):
tip: the first node ID information line is for nodemanager, the second node ID line is for spotfire server.
check the antivirus block list
check the spotfire_db.nodes in database and found the old version’s ID number.
to check the nodes ID, by command prompt: \tibco\tss\10.3.10\tomcat\spotfire-bin>config list-nodes
by command prompt: \tibco\tss\10.3.10\tomcat\spotfire-bin>config delete-node --id=xxxxxxx
change the content in \tibco\tsnm\10.3.10\nm\config\nodemanager.properties, and restart node manager
to link well with chemical db which is to save chemical structure, we must change the configuration by the commands below in command prompt(space below –value):
Windows service account should set to be an AD controlled account for node manager(webplayer), so that the webplayer can get the information from not only the local but also its neighbours’
eg: domain name/web player ad account
to set the default saving path when save file in the library:
UI config -> Configuration Tab->Public Address:
Enable custom public address:Yes
Public address URL: spotfire server full name
when under active directory, to give the node manager ability to visit other server’s file
windows server 2012 -> server manager-> computer administration->system tool-> local user and group-> group-> Administrators ->double click->add the ad account to local
export (command: tibco/tss/10.3.10/tomcat/spotfirebin->config export-service-config –capability=WEB_PLAYER –deployment-area=XXX) and set the Spotfire.Dxp.Worker.Host.exe.config file in path:\tibco\tss\10.3.10\tomcat\spotfire-bin\config_Web Player\root, and import it, insert the userid and password, eg:
<!-- Proxy authentication settings. -->
<!-- To use these, you need to add a proxy section, including the proxy address,  to section "system.net/defaultProxy/" below. -->
<setting name="ProxyUsername" serializeAs="String">
<value>USERID</value>
</setting>
<setting name="ProxyPassword" serializeAs="String">
<value>PASSWORD</value>
</setting>
<!--Authentication settings for TIBCO Spotfire Statistics Services -->
<!-- A list of URLs -->
in default communication configuration between AP server and nodemanager server, the port 9443 is for https implement communication, and 9080 is the base layer for http
if using oracle pdb‘s instance:
in batch file:
the instance name should be: //localhost/orclpdb
and when import the dump file, you need to put it into the random folder it made, like app/oracle/admin/orcl/dpdump/F2BBAEADB6274F34AFBAEC1772546E79
for JA16SJISTILDE, need to having the driver of orai18n.jar
The module for installation is in the path, such as the Visual C++ installer:
config export-library-content --tool-password=pw --file-path=C:/outputfilename --item-type=all_items --user=spotfire@SPOTFIRE --include-access-rights=true --library-path="/Test for case have space"
communicate between Spotfire Server and Node Manager without going through a proxy, you need to refresh the configure file for web player, append the red part, and grey is optional:
 <system.net>

       <defaultProxy enabled="true">

        <bypasslist>

            <add address="Service IP, like web Player, Python Service, etc." />

        </bypasslist>

        <proxy bypassonlocal="true" proxyaddress="Proxy Server IP" />

       </defaultProxy>

     </system.net>
check the connection to certain pc, and check its ip address:
ping computer fullname -4
to check the computername in command prompt:
set com
or to see the environment variable path:
set
check current user logined information in the OS:
set user
check all port: netstat -bn to check who has occupied the port: netstat -ano| findstr 8080 to show the pid number: tasklist | findstr 1048 to kill process: taskkill /pid 1048 /F
Gain Ownership: takeown /f xxx.pem Grants current user ownership of xxx.pem.
Modify Permissions: icacls xxx.pem /grant Administrators:F Gives Administrators full access to xxx.pem.
Manual Installation of OpenSSH Using PowerShell
Install OpenSSH Server: Open PowerShell as an administrator and run: Add-WindowsCapability -Online -Name OpenSSH.Server~~~~0.0.1.0
Start SSH Service: Start the service and set it to automatic startup: # Get the service named sshd and start it Get-Service -Name sshd | Start-Service # Get the service named sshd and set its startup type to automatic Get-Service -Name sshd | Set-Service -StartupType Automatic # Check the status of the service named sshd Get-Service -Name sshd
geo_mean_acq = pd.DataFrame({'order': [1, 3]})

cands:
  order a    b   c   d
0  1    10   40 70 100
1  2    20   50 80 110
2  3    30   60 90 120

acq:
  order A B
0  6    4 7
1  2    5 8
2  1    6 9

geo_mean_acq:
   order
0   1
1   3

cands.set_index('order', inplace=True)
acq.set_index('order', inplace=True)
先各自把cands和acq的order这一列当作index,方便实验比较

result1 = pd.concat([cands, acq, geo_mean_acq], join='outer', axis=1)

result1:
   a   b    c     d     A    B  order
0 NaN  NaN  NaN  NaN   NaN  NaN 1.0
1 10.0 40.0 70.0 100.0 6.0 9.0 3.0
2 20.0 50.0 80.0 110.0 5.0 8.0 NaN
3 30.0 60.0 90.0 120.0 NaN NaN NaN
6 NaN  NaN  NaN  NaN   4.0 7.0 NaN

也就是说非index列拼接直接是按照各自的索引号对应横着(axis=1时)拼接,
新的索引的最大值是拼接数据里索引最大值,凡是空缺都用Nan来填补

所以在拼接前一定确保要拼接的数据框们和最终合并输出结果时候的索引是一样的

至于.reindex()
cands.reindex(acq.index)
把cands的索引变成acq的索引,当然索引对应的数值也跟着变,排序也变化
结果是:
       a  b    c   d
order
6     NaN NaN NaN NaN
2     20  50 80 110
1     10  40 70 100
注意顺序变化了,是6,2,1

假如是pd.concat([cands, acq], join='outer', axis=1)
结果是:
        a     b     c    d   A    B
order
1       10.0 40.0 70.0 100.0 6.0 9.0
2       20.0 50.0 80.0 110.0 5.0 8.0
3       30.0 60.0 90.0 120.0 NaN NaN
6       NaN  NaN   NaN  NaN  4.0 7.0

假如pd.concat([acq, cands], join='outer', axis=1)
结果是:
        A    B    a    b     c     d
order
1       6.0 9.0 10.0 40.0 70.0 100.0
2       5.0 8.0 20.0 50.0 80.0 110.0
3       NaN NaN 30.0 60.0 90.0 120.0
6       4.0 7.0 NaN   NaN  NaN   NaN

trans1 = pd.concat([cands.reindex(acq.index), acq], join='outer', axis=1)
结果是:
trans1:
        a   b    c  d  A B
order
6      NaN NaN NaN NaN 4 7
2      20  50  80  110 5 8
1      10  40  70  100 6 9

对比结果,用reindex主要是形成了筛选作用限定了要显示出来的
index的值并限定了顺序

pandas1.0以后把以前的join_axes踢掉,索引顺序默认第一个数据框,
没得索引范围的选择,直接是取索引们的并集(以前是依靠join_axes),
合并后第一个数据框放最左边
若要想指定参照索引范围和顺序,则需要利用reindex改变数据框的索引范围和顺序。
当要合并的数据框们各自的索引一样时,索引顺序会保持,如果索引不一样,则
顺序排列。
版本升级后功能被详细分出来了。
SID SERVICE_NAME bob1 bob bob2 bob bob3 bob bob4 bob
SERVICE_NAMES:Oracle recommends that the value of the service_name be the same as the ORACLE_SID. However, a service_name can point to more than one instance
means create a table named tbl1 with the column information and belonged to the tablespace named tabsp, and, under the schema, the username who having logined in the oracle.
COMMIT;
quit: is to quit database system
Two connection styles:
ODBC(Open Database Connectivity): through database connector
JDBC(Java Data Base Connectivity):through information link
ROWID resembles the key of the row in each datatable, and it cannot be changed mannualy but automatically allocated by system. It is a must to ask the rowid clearly, eg.
SELECT rowid,empno FROM emp;
To look for the version of Oracle:
SELECT * FROM V$VERSION;
sqlplus / as sysdba(short style for the next one)
sqlplus user1/pass1 as sysdba(used the login information)
shutdown the database: sqlplus->shutdown immediate
startup the database: sqlplus->startup
NOMOUNT・・・read the initial parameter->STARTUP NOMOUNT MOUNT・・・read the redo log file, path, etc.->STARTUP MOUNT OPEN・・・read the .dbf file, open state->STARTUP
sqlplus username/password@orcl
run by quote from file:
@d:\test\emp.sql;
@d:\test\emp_para.sql 'A009', 'XXX', 'TO1';
start with the command:
sqlplus username/password@orcl @d:\test\emp.sql;
CREATE OR REPLACE DIRECTORY dp_dir AS 'd:\dump';
means let the dp_dir to ‘d:\dump’
drop directory dp_dir;
means delete directory dp_dir
GRANT READ ON DIRECTORY dp_dir TO test;
means give the test the authority to read the dp_dir
GRANT WRITE ON DIRECTORY dp_dir TO test;
means give the test the authority to write the dp_dir
The command below is used in command prompt, which is to copy all the database file content to somewhere.
The above is to create tablespace named tabsp, showing the file path, size, which is able to extend(For tempfile, add TEMPORARY and use TEMPFILE instead of DATAFILE in the command)
CREATE TABLESPACE TABSP DATAFILE
'D:\oradata\orcl\TABSP1.dbf' SIZE 300M
AUTOEXTEND ON NEXT 100M MAXSIZE UNLIMITED,
'D:\oradata\orcl\TABSP2.dbf' SIZE 300M
AUTOEXTEND ON NEXT 100M MAXSIZE UNLIMITED;
It can be even put into 2 more files.
ALTER DATABASE DATAFILE 'D:\oradata\TABSP1.dbf' RESIZE 500M;
change the size of the datafile for a tablespace, only available to shrink the size when there is no data inside.
Change it to automatically extend the datafile:
ALTER DATABASE DATAFILE 'D:\APP\TEST\ORADATA\ORCL\TABSP1.DBF'
AUTOEXTEND ON NEXT 100M
MAXSIZE UNLIMITED;
to check the autoextensible state:
SELECT TABLESPACE_NAME, FILE_NAME, AUTOEXTENSIBLE
FROM DBA_DATA_FILES
ORDER BY 1
SELECT TABLE_NAME,COLUMN_NAME,DATA_TYPE,DATA_LENGTH,DATA_PRECISION,DATA_SCALE FROM ALL_TAB_COLUMNS WHERE OWNER = ‘username’ AND TABLE_NAME = ‘tablename’;
username and tablename is Case Sensitive!!!
CREATE USER username IDENTIFIED BY password DEFAULT TABLESPACE TABSP1 TEMPORARY TABLESPACE TEMP QUOTA UNLIMITED ON TABSP1 QUOTA UNLIMITED ON TABSP2;
SELECT * FROM V$RESOURCE_LIMIT WHERE RESOURCE_NAME = ‘processes’ OR RESOURCE_NAME = ‘sessions’;
to check all the username can be seen by current logined user:
SELECT * FROM ALL_USERS ORDER BY USERNAME;
more user information in detail:
SELECT USERNAME,ACCOUNT_STATUS,DEFAULT_TABLESPACE,TEMPORARY_TABLESPACE,PROFILE FROM DBA_USERS ORDER BY USERNAME;
give the privilege to create table:
GRANT CREATE TABLE TO SATOU;
give the privilege to insert on table:
GRANT INSERT ON TABLE_A TO SATOU;
check the sysdba role: SELECT * FROM V$PWFILE_USERS;
check the dba role: sysdba>dba role
SELECT * FROM DBA_ROLE_PRIVS
WHERE GRANTED_ROLE ='DBA';
If using spfile mode(only spfile needs restart) to change the processes and sessions maximum:https://sql-oracle.com/?p=395
ALTER SYSTEM SET PROCESSES = 1000 SCOPE=SPFILE;
ALTER SYSTEM SET SESSIONS = 1000 SCOPE=SPFILE;
size change of SGA(System Global Area, needs restart):
ALTER SYSTEM SET SGA_MAX_SIZE = 1G SCOPE=SPFILE;
ALTER SYSTEM SET SGA_TARGET = 1G SCOPE=SPFILE;
to confirm SGA:
show parameter sga_;
size change of PGA(Program Global Area, needs restart):
ALTER SYSTEM SET PGA_AGGREGATE_TARGET = 500M SCOPE=SPFILE;
to confirm PGA:
SHOW PARAMETER TARGET;
After Oracle 11gR2, the memory distribution is automated, without setting sga_target and pga_aggregate_target seperately using the command as follows, then reboot the oracle service:eg:
create spfile=’C:\app\Administrator\virtual\product\12.2.0\dbhome_1\database\SPFILEORCL.ORA’ from pfile=’C:\app\Administrator\virtual\admin\orcl\pfile\init.ora’;
alter system set sga_target=0 scope=spfile;
alter system set pga_aggregate_target=0 scope=spfile;
alter system set memory_target=16G scope=spfile;
alter system set memory_max_target=24G scope=spfile;
make synonym for table:
CREATE SYNONYM othername FOR tablename;
make public synonym for table(available for all users):
CREATE OR REPLACE PROCEDURE proA IS nCnt NUMBER; rEmp emp%ROWTYPE; tEmpNo emp.empno%TYPE; BEGIN nCnt := 1; rEmp.empno := ‘A0101’; tEmpNo := ‘A0101’; END;
if there is prameter:
CREATE OR REPLACE PROCEDURE proA(nEno IN NUMBER) IS nCnt NUMBER; BEGIN UPDATE emp SET salary = salary * 2 WHERE empno = nEno; END;
oracle’s function:
CREATE OR REPLACE FUNCTION funA RETURN NUMBER IS nCnt NUMBER; BEGIN nCnt := 1; RETURN nCnt; END;
or if there is parameter:
CREATE OR REPLACE FUNCTION funA(nEno IN NUMBER) RETURN NUMBER IS nSal NUMBER; BEGIN SELECT salary INTO nSal FROM emp WHERE empno = nEno; RETURN nSal; END;
DROP PROCEDURE pro1; DROP FUNCTION fun1; DROP PACKAGE pac1;
the usage of loop:
(1.loop exit when):
CREATE OR REPLACE PROCEDURE proA IS nCnt NUMBER; BEGIN LOOP nCnt := nCnt + 1; EXITWHEN nCnt > 10; END LOOP; END;
(2.while loop):
CREATE OR REPLACE PROCEDURE proA IS nCnt NUMBER; BEGIN WHILE (nCnt <= 10); LOOP nCnt := nCnt + 1; END LOOP; END;
(3.for loop):
CREATE OR REPLACE PROCEDURE proA IS nCnt NUMBER; BEGIN FOR nCnt IN 1 .. 10 LOOP nCnt := nCnt + 1; END LOOP; END;
the usage of if:
1.
IF nEmpNo > 100 THEN nCnt = 1; END IF;
2.
IF nEmpNo > 100 THEN nCnt = 1; ELSIF nEmpNo < 10 THEN nCnt = 0; END IF;
3.
IF nEmpNo > 100 THEN nCnt = 1; ELSIF nEmpNo < 10 THEN nCnt = -1; ELSE nCnt = 0; END IF;
the usage of case:
CASE WHEN nEmpNo > 100 THEN nCnt = 1; WHEN nEmpNo < 10 THEN nCnt = -1; ELSE nCnt = 0; END CASE;
check the service of oracle available, and description for alias in command prompt:
tnsping servicename
check the listener’s state in command prompt:
lsnrctl status
start or stop the listener:
lsnrctl start
lsnrctl stop
show all the table under a certain schema:
select table_name from USER_TABLES;
to open PDB(pluggable database, default pdb’s instance name is orclpdb):
sqlplus / as sysdba check the sate: select con_id,name,open_mode from v$pdbs; and then: alter pluggable database ORCLPDB open; alter session set container=ORCLPDB; commit; restart the database
check the connected container: SQL> show con_name; check the pdb name: SQL> select pdb_name from cdb_pdbs; connect to the pdb: SQL> alter session set container = ORCLPDB;
to keep it starts with the windows server startup, you need to save the PDB’s state:
to output csv by sql script and in a good format, under sqlplus:
set echo off set termout off set heading on set linesize 32767 set trimspool on set colsep ‘,’ set underline off set feedback off set pagesize 0 embedded on set pause off set mark csv ON spool “result.txt” @ “xxx.sql” spool off
check the tablespace’s datafile size in physical hard disk:
select tablespace_name,file_name,bytes/1024/1024/1024"GB" from dba_data_files;
create directory for importing and exporting dumpfile:
create directory xxx as'C:\foldername';
show which instance it is using when the oracle is in cluster:
select * from v$instance;
show error of a certain view:
show errors view schemaname.viewname;
compile a view to check error:
alter view schemaname.viewname compile;
check which segment the schema has:
select segment_name, tablespace_name from dba_segments where owner=‘schemaname‘;
check which object the schema has, including view:
select object_name,object_type from dba_objects where owner=’schemaname‘;