Setting Up Ethereum Smart Contract Development Environment

create a project folder.

use Visual Studio Code to create a sol file.

if you are on window 10, in command prompt, npm install -g @remix-project/remixd@0.5.1 to install remixd -> https://github.com/ethereum/remix-project/issues/1786

npm WARN deprecated chokidar@2.1.8: Chokidar 2 will break on node v14+. Upgrade to chokidar 3 with 15x less dependencies.
npm WARN deprecated fsevents@1.2.13: fsevents 1 will break on node v14+ and could be using insecure binaries. Upgrade to fsevents 2.
npm WARN deprecated resolve-url@0.2.1: https://github.com/lydell/resolve-url#deprecated
npm WARN deprecated urix@0.1.0: Please see https://github.com/lydell/urix#deprecated
D:\Program Files\nodejs\npm_global\remixd -> D:\Program Files\nodejs\npm_global\node_modules\@remix-project\remixd\bin\remixd.js
npm WARN optional SKIPPING OPTIONAL DEPENDENCY: fsevents@^1.2.7 (node_modules\@remix-project\remixd\node_modules\chokidar\node_modules\fsevents):
npm WARN notsup SKIPPING OPTIONAL DEPENDENCY: Unsupported platform for fsevents@1.2.13: wanted {"os":"darwin","arch":"any"} (current: {"os":"win32","arch":"x64"})

+ @remix-project/remixd@0.5.1
added 186 packages from 130 contributors in 8.704s

then remixd -s “project folder path” –remix-ide https://remix.ethereum.org or remixd -s . to start the server.

[WARN] latest version of remixd is 0.5.3, you are using 0.5.1
[WARN] please update using the following command:
[WARN] npm install @remix-project/remixd -g
[WARN] You can only connect to remixd from one of the supported origins.
[WARN] Any application that runs on your computer can potentially read from and write to all files in the directory.
[WARN] Symbolic links are not forwarded to Remix IDE

to mirror on the remix online IDE: https://remix.ethereum.org/, you need to choose your localhost and connect.

check the version: remixd -v

https://remix-ide.readthedocs.io/en/latest/remixd.html

get tokens on the Goerli(test) environment:

tweet the sentence below, and use that url to get from https://faucet.goerli.mudit.blog/

Requesting faucet funds into 0xYOU_ADDRESS on the #Rinkeby #Ethereum test network.

Raspberry Pi 4B Application Deployment

Download centos 7(CentOS-Userland-7-armv7hl-RaspberryPI-Minimal-4-2009-sda.raw.xz 2020-10-30 11:07 307M) in the link below:

Index of /pub/linux/centos-altarch/7.9.2009/isos/armhfp

Flash SD Card by Etcher, in exFat format.

How To Install CentOS 8 in Raspberry PI

after the first boot up, rootfs-expand, then reboot.

Insert the LAN cable, nmcli d to check the state, set the wifi by nmtui, then yum -y update, yum -y upgrade, install GNOME GUI for CentOS 7 by sudo yum -y groups install "GNOME Desktop", echo "exec gnome-session" >> ~/.xinitrc, startx, systemctl set-default graphical.target, you can see the link below:

https://www.fosslinux.com/8570/how-to-install-gnome-gui-on-centos.htm

or watch the youtube link:

As for the default setting, you need to make the Power saving mode off:

setterm -powersave off -blank 0

add information below into /etc/rc.local

/usr/bin/setterm -powersave off -blank 0

for the case if the monitor not in full screen, then edit the /boot/config.txt, make sure disable_overscan=1 is uncommented, then reboot.

Monitor not full screen

to install Golang for the arm architecture, download such as go1.16.7.linux-armv6l.tar.gz at this link: Downloads

similar method to install Golang is in this link below:

https://www.tecmint.com/install-go-in-linux/

Put customized packages in the default directory where /usr/local/go/src, for centos, or /usr/share/go-1.18/src, for ubuntu

check go env, confirm that GO111MODULE="off", if it is not, use the command go env -w GO111MODULE=off to make it off.

Error message “go: go.mod file not found in current directory or any parent directory; see ‘go help modules'”

to install Python3, check the link below, set alias python='/usr/bin/python3' is essential, as the Python 2 is already installed initially in centos7:

https://www.ino-shika-cho.com/index.php/2020/10/16/post-1212/

to install the numpy and pandas, you need to execute the commend below at first, as Ollegn’s answer at this link

Problems with pip install numpy – RuntimeError: Broken toolchain: cannot link a simple C program

sudo yum install python3-devel
sudo yum install make automake gcc gcc-c++ gcc-gfortran
sudo yum install redhat-rpm-config
sudo yum install subversion

then install numpy and pandas

sudo pip3 install numpy

sudo pip3 install pandas

to schedule the task with solving the permission problem, use:

sudo crontab -u yourUserName -e

schedule python task, eg:

41 14 * * * /usr/bin/python3 /home/username/xxx.py

how to install mysql on raspberry:

you can refer to this article:

Setup a Raspberry Pi MYSQL Database

ラズパイにMySQLをインストール

yum install mariadb-server

sudo systemctl start mariadb

sudo mysql_secure_installation

the default password is none, so enter enter-key as none initially.

You should answer “Y” to all prompts when asked to answer “Y” or “N“. such as:

Remove anonymous users? [Y/n] y

try login use: sudo mysql -u root -p

to connect raspberry through remote connection from windows:

How to Generate & Set Up SSH Keys on CentOS 7

windows setting like below:

first make a publickey in windows like, about the cryptography check this link:

SSH Key: Ed25519 vs RSA

ssh-keygen -o -a 100 -t ed25519 -f D:\certificationName -C "any comment"

check this link about flag -a:

How many KDF rounds for an SSH key?

then copy the certificationName.pub (-rw-r–r–)to the linux server directory like below:

/home/userName/.ssh

then change the sshd_config content using the command sudo vi /etc/ssh/sshd_config to edit like below:

PermitRootLogin no

PubkeyAuthentication yes

AuthorizedKeysFile .ssh/certName.pub

PasswordAuthentication no

then restart the sshd service:

sudo systemctl restart sshd.service

refer this link to set the firewall:

SELinuxとfirewall設定の変更

then you can try login the remote server through the command like:

ssh -v -i D:\certificationName -p portNumber username@ipAddress

port forwarding(for Windows, objectServerHostPort default is 3389):

ssh -v -i D:\certificationName -p portNumber jumpBoxUsername@jumpBoxIpAddress -L UsedinLocalClientPort:objectServerHostName:objectServerHostPort

if object server is linux system:

ssh -v -i D:\certificationName -p UsedinLocalClientPort objectServerUserAccount@localhost

if obeject server is windows system:

open mstsc, localhost:UsedinLocalClientPort, then login

to copy file from windows to linux server:

scp – Permission denied (publickey,gssapi-keyex,gssapi-with-mic)

eg: scp -P portNumber -rp -i certificationName D:\xxx.txt userName@ipAddress:/home/userName/Downloads

to copy file from linux server to windows:

eg: scp -P portNumber -rp -i certificationName userName@ipAddress:/home/userName/test.txt D:\xxx

to prevent from /dev/shm/ being removed automatically:

Why are the contents of /dev/shm/ is being removed automatically

There are two possible solutions:

Create the files with/for a system user — a user created with the system option (adduser -r or adduser –system)

or
Edit /etc/systemd/logind.conf, uncomment the line RemoveIPC=yes, change it to RemoveIPC=no, save, and reboot the system

if you use Raspberry Pi OS, you can use sudo raspi-config to set the configuration

How To Disable WiFi Power Management On Raspberry Pi:

vi /etc/rc.local to add the content:

# Print the IP address
_IP=$(hostname -I) || true
if [ "$_IP" ]; then
  printf "My IP address is %s\n" "$_IP"
fi
iwconfig wlan0 power off
exit 0

iwconfig to confirm it and reboot

add the content at last in: /etc/xdg/lxsession/LXDE-pi/autostart

@xset s noblank
@xset s off
@xset dpms

change and make sure the content below in /etc/lightdm/lightdm.conf, and reboot

xserver-command=X -s 0 -dpms

to install opencv and test:

sudo apt update
sudo apt install libopencv-dev python3-opencv
python3 -c "import cv2; print(cv2.version)"

如何在 Ubuntu 20.04 上安装 OpenCV

remove the GUI from Raspbian/Debian:

sudo apt-get remove --purge x11-common
sudo apt-get autoremove

How to fix “Package is in a very bad inconsistent state” error:

sudo dpkg --remove --force-remove-reinstreq packageName
sudo apt-get install packageName

Install nmtui on Raspberry Pi OS

How To Set Up Raspberry Pi As A DNS Server

Install Transmission on the Raspberry Pi For An “Always-on” Torrent Client

settings.json location changed: /var/lib/transmission-daemon/.config/transmission-daemon/settings.json
(you need to stop the service and then change those files)
set inbount IP address:
"rpc-whitelist": "192.168.1.*",

add epel.repo to CentOS armv7:

cat > /etc/yum.repos.d/epel.repo << EOF
[epel]
name=Epel rebuild for armhfp
baseurl=https://armv7.dev.centos.org/repodir/epel-pass-1/
enabled=1
gpgcheck=0

EOF
yum clean all
yum update

Driver of 3.5 Inch 480×320 TFT Display with Touch Screen for Raspberry Pi

search by IP list: nmap -iL targetsIPList.txt
scan machine by: eg: sudo nmap -sn 192.168.1.0/24

agressive mode: nmap -A IPaddress

trace route: nmap --traceroute IPaddress

check system: nmap -O IPaddress

check service version: nmap -sV IPaddress

check first 1000 ports: nmap -F IPaddress

check for certain port: nmap -p port/serviceName IPaddress

eg: nmap -p yourPortNumber 192.168.1.0/24

* if the certain port is open, you can confirm that server.

check every port: nmap -p- IPaddress

display only opened port: nmap --open IPaddress

to install the mailx:

sudo apt -y install bsd-mailx

How do I change the color for directories with ls in the console?

Changing colors for user, host, directory information in terminal command prompt

How to Setup a Raspberry Pi Plex Server

pivpn troubleshooting:

you may meet the issue when install pivpn after ufw set:

$ sudo ufw enable
Command may disrupt existing ssh connections. Proceed with operation (y|n)? y

ERROR: problem running ufw-init
Bad argument `COMMIT'
Error occurred at line: 14
Try `iptables-restore -h' or 'iptables-restore --help' for more information.
ip6tables-restore v1.8.7 (nf_tables): host/network `' not found
Error occurred at line: 13
Try `ip6tables-restore -h' or 'ip6tables-restore --help' for more information.

Problem running '/etc/ufw/before.rules'
Problem running '/etc/ufw/before6.rules'

as it changed content in /etc/ufw/before.rules and /etc/ufw/before6.rules, check ERROR: problem running ufw-init

pivpn -d debug mode and it corrected the issue

pivpn installer failing to run iptables-save.

Check /var/log/xrdp.log , /var/log/xrdp-sesman.log 解决xrdp登陆不上的问题:xrdp session: Login failed for display 0

How to set up OpenVPN on Linux (with detailed Linux Mint tutorial)

Install Squid proxy on Ubuntu 20.04

enable the i2c interface

WireGuard Linux GUI Client

R Command

check library path:

.libPaths()

stop warning:

eg: suppressWarnings(library(survival))

online install, using a certain directory: eg:

install.packages(“survival”, lib=”C:\Program Files\\TIBCO\\statsvcs103\\statTERR\\engines\\Terr\\library”, dependencies=TRUE)

update the packages in the library:

update.packages()

check the packages are installed:eg:

library(rJava)

delete packages:eg: remove.packages("packageName")

check the dependency of a certain package: eg: ggplot2

install.packages("packrat")
packrat:::recursivePackageDependencies("ggplot2",lib.loc = .libPaths()[1],ignores=0)

check package version: eg: packageVersion("rJava")

download from a certain online repo: eg: install.packages('rJava', repos = "https://cran.microsoft.com/")

check R library directory: .libPaths();

R package archive

install certain package on linux: eg:

.libPaths();
export R_LIBS="/usr/local/lib/R/site-library"
sudo R CMD INSTALL -l /usr/local/lib/R/site-library rJava_0.9-13.tar.gz 
packageVersion("rJava")

SqlServer Command

login:

osql -S localhost -U sa -P xxxx

check sqlsever version:
select @@version
go

check collation name(characterset):

select name, collation_name from sys.databases

backup database:

BACKUP DATABASE DatabaseName TO DISK="D:\example\backupName.BAK" WITH INIT

GO

restore database:

SQLCMD -E -S LOCALHOST -Q "RESTORE DATABASE spotfire_server FROM DISK='C:\1\sp103.BAK' WITH REPLACE"

check all the databasename:

SELECT name, database_id, create_date FROM sys.databases ; GO

if execute through batch file: eg:

sqlcmd -i actionlog_refresh.sql > createview_log.txt

output the available hard disk volume size:

SELECT 
    volume_mount_point AS [Drive],
    total_bytes / 1024 / 1024 / 1024 AS [Total Size (GB)],
    available_bytes / 1024 / 1024 / 1024 AS [Available Space (GB)],
    (available_bytes * 1.0 / total_bytes) * 100 AS [Free Space %]
FROM sys.master_files AS f
CROSS APPLY sys.dm_os_volume_stats(f.database_id, f.file_id)
GROUP BY volume_mount_point, total_bytes, available_bytes
ORDER BY volume_mount_point;
GO

Docker Command

save image to .tar file:

docker save -o exportName.tar imageName

docker save imageName > exportName.tar

load .tar to image:

docker load -i image.tar

list images:

docker image ls

docker images

make container: 实例:制作自己的 Docker 容器

docker container run -p pcSidePort:containerSidePort -it imageName

check docker version:

docker version

check the state of docker:

docker ps -a

restart the container:

docker restart IDNumber

show front 100 line logs:

docker logs IDNumber -f --tail 100

start docker:

systemctl start docker

RHEL/CentOS 8 Preparation for Installation:

sudo dnf -y install iptables --nobest ||:
sudo dnf -y install iptables-services --nobest
sudo systemctl disable firewalld ||:
sudo systemctl disable nftables ||:
sudo systemctl enable --now iptables.service
sudo dnf rm -y podman
sudo dnf config-manager \
--add-repo=https://download.docker.com/linux/centos/docker-ce.repo
sudo sed -i '/ˆgpgkey=https:\/\/download.docker.com\/linux\/centos\/gpg/a module_hotfixes=True' \
/etc/yum.repos.d/docker-ce.repo
sudo dnf install -y --nobest docker-ce
yum erase podman buildah
sudo yum install docker-ce docker-ce-cli containerd.io
sudo systemctl enable --now docker
sudo systemctl status docker

Create docker user group:
sudo groupadd docker
set group password and make user become group administrator:
sudo gpasswd -a $USER docker
put user into a group:
sudo usermod -aG docker $USER
Switch the current non-root user group to the docker user group:
exec newgrp docker
veryfy it:
docker run hello-world

Installation of docker-compose:

ver1:

binary="docker-compose-$(uname -s)-$(uname -m)"
compose=/usr/local/bin/docker-compose
sudo curl -L "https://github.com/docker/compose/releases/download/1.29.2/$binary" -o $compose
sudo chmod +x $compose
sudo restorecon -v $compose

ver2:

sudo curl -L "https://github.com/docker/compose/releases/download/v2.29.2/$binary" -o $compose

The restorecon command is only needed in an SELinux environment.

check all the output log of the containers in docker:

docker-compose logs

show the node in cluster:

docker node ls

show the network in docker:

docker network ls

show current stack:

docker stack ls

then show task in the stack:

docker stack ps stackName

show docker system information:

docker info

get container’s metadata:

docker inspect IDname

about docker plugin:

docker plugin命令

docker plugin COMMAND

how to change docker network setting(docker0):

docker のネットワーク (docker0) 設定変更

check docker config:

docker config ls

get into the container:

docker exec -it ContainerID bash

set proxy for docker:

sudo vi /etc/systemd/system/docker.service.d/http-proxy.conf

Then fill in the proxy server content:

[Service]
Environment="HTTP_PROXY=http://xxx:PortNumber"
Environment="HTTPS_PROXY=http://xxx:PortNumber"

then restart docker and test the content:

sudo systemctl daemon-reload
sudo systemctl restart docker
sudo systemctl show --property=Environment docker

How to save all Docker images and copy to another machine

start docker container, load from local otherwise from docker hub(-d means run background, -it means keep running):

docker run --restart=always --name containerName -p hostPort:containerPort -e firstEnvironmentVariable=xxx -it -d imageName:tagVersion

down load the container image: docker pull imageName

stop the container: docker stop containerID

start the container: docker start containerID

delete the container: docker rm containerID

delete the container image: docker rmi containerID:version

Dockerfile example(use ubuntu 20.04, as root, set env variable envVariableName, set work directory, use add to copy the file from internet, execute script.py then end container):

FROM ubuntu:20.04
USER root

RUN apt update
RUN apt install -y python3.9
RUN apt install -y python3-pip

COPY requirements.txt .
RUN python3.9 -m pip install -r requirements.txt

ENV envVariableName=xxx

WORKDIR /absolutePath
ADD https://xxx.xxx .

COPY script.py .
ENTRYPOINT ["python3.9", "script.py"]

create a docker image: docker build -t imageName:version -f Dockerfile .

Docker Error – Requires: container-selinux >= 2:2.74

Cannot install docker in a RHEL server —-> slirp4netns >= 0.4

check container automatically start status:

docker inspect -f "{{.Name}} {{.HostConfig.RestartPolicy.Name}}" $(docker ps -aq)

clear all the docker images:

docker stop $(sudo docker ps -aq)
docker rm $(sudo docker ps -aq)
docker rmi $(sudo docker images -q)
docker system prune -a

resource usage statistics:
docker stats
docker stats
container_id_or_name

clean unused Docker resources:

docker system prune -a

PostgreSQL Commands

connect into postgres(default) database:

psql –U postgres

connect other db server in command prompt:

set PGPASSWORD=XXX
psql -h hostname -p 5432 -d databaseName -U userName -W

https://stackoverflow.com/questions/32824388/postgresql-remotely-connecting-to-postgres-instance-using-psql-command

show installed locale:

SHOW LC_COLLATE

making backup file:

pg_dump -U postgres SID/database/server's name> dbexportname.pgsql

backup by tar file(better for binary data):

pg_dump -U [yourUserName] -h [yourHostName] -F t -f xxx.tar [yourDataBaseName]

restore by tar file:

pg_restore -U [yourUserName] -h [yourHostName] -d [yourDatabaseName] -F t xxx.tar

restore from dump file:

psql -U accountName databaseName < backupName.pgsql

list all database:

\l

check databasename:

\db+

show main data directory:

show data_directory;

check password lifetime:

https://www.modb.pro/db/103980#51_pg_userpg_authidpg_rolespg_auth_members_305

\d pg_user

check the user’s capacity:

select * from pg_user where usename='yourUserName';

select * from pg_authid;

select * from pg_authid where rolvaliduntil is null;

pset null ‘null’;

select rolename,rolvaliduntil from pg_authid;

check the charactor code:

show server_encoding;

clear screen:

\! cls

use db account postgres to log into the spotfire_server db:

psql -d spotfire_server -U postgres

check postgreSQL version:

psql -V

check settings like:

select setting from pg_settings where name='port';

https://qiita.com/awakia/items/9981f37d5cbcbcd155eb

List all tables in postgresql information_schema:

https://stackoverflow.com/questions/2276644/list-all-tables-in-postgresql-information-schema

select * from pg_tables where schemaname = 'information_schema';

create a database without dbcreate privilege and user:

eg:

createuser spotfire_joindb with password 'spotfire' nocreatedb;
create database spotfire_joindb;
alter database spotfire_joindb owner to spotfire_joindb;

check the os: select version();

calculate row size of postgres table row:

https://stackoverflow.com/questions/34222996/how-to-get-each-row-size-of-a-particular-table-in-postgresql?answertab=active#tab-top

SELECT sum(pg_column_size(t.)) as filesize, count() as filerow FROM tableName as t;

check the column’s data type:

select pg_typeof(colName) from tableName;

show the data table in a certain database:

\dt

delete table:

DROP TABLE test;

delete database:

drop database databaseName;

Change default PostgreSQL passwords

cancel peer authentication:

change the content in /etc/postgresql/13/main/pg_hba.conf as below:

# "local" is for Unix domain socket connections only
local   all             all                                     md5

set listen inbound port:

change the content in /etc/postgresql/13/main/postgresql.conf:

listen_addresses = '*'               # what IP address(es) to listen on;

set inbound IP address:

change the content in /etc/postgresql/13/main/pg_hba.conf:

# IPv4 local connections:
host    all             all             127.0.0.1/32            md5
host    all             all             192.168.1.0/24            md5

PostgreSQL data file folder: show data_directory;

Linux

solve the internet connection problem:https://geekflare.com/no-internet-connection-from-vmware-with-centos-7/

dhclient -v

to command mode:

Ctrl+Alt+F2

clean the screen:

clear

synchronize data on disk with memory:

sync

show all the files under a folder:

ls -alht

ls -alht --time-style=+'%Y/%m/%d %H:%M:%S'

set in .bashrc: alias ll="ls -alht --color=auto --time-style=+'%Y/%m/%d %H:%M:%S'"

https://traincat.net/blog/neko/archives/000334.html

ls -l --full-time

ls -l /

show folder xx*:

ls -ld *

check how many files in a folder linux:

ls -l . | egrep -c '^-'

ls -1 | wc -l

check the ip address:

ifconfig -a

ip a

ip r | grep default

look the previous page:

SHIFT+PGUP

ping IP address:

ping -4 DESTINATION

open vi:

/bin/vi xxx.txt

check the format of file in \r or \n:

in vim: :set ff?

change color to be easily seen:

:color ron

change it to unix: :set ff=unix

clear all the firewall rules: https://www.shuzhiduo.com/A/gAJGaeyndZ/

iptables -F

check Linux version:

cat /etc/redhat-release

cat /etc/os-release

lsb_release -a

check the kernel of Linux: uname -r

show system information: uname -a

show current path(not shortcut, the real place):

pwd -P

read, write and executable:

sudo chmod 777 filename

zip a folder:

zip -r temp.zip ./temp/

make a new directory:

mkdir -p parent/son
mkdir -m 711 xxx
move/rename folder:
mv folderName newFolderName
check memory state:
cat /proc/meminfo
check cpu information:
lscpu | egrep 'Model name|Socket|Thread|NUMA|CPU\(s\)'
show current time:
date +%Y/%m/%d
date +%H:%M
date '+%F'
date
poweroff Linux:
/sbin/shutdown -h now
1 min later:
/sbin/shutdown -h 1
/sbin/shutdown -h 10:33
cancel it:shutdown -c
reboot now:
reboot
/sbin/shutdown -r now
users' home folder is located in:
~ means /home/xxx
but root's home is in /root
file with . prefix can be a hidden file.
eg: .bash_profile
open GNOME,KDE,TWM:
startx
logout: exit(ctrl+d)
check calendar:
cal 06 2021
calculator:
bc
echo "1+35" | bc
scale=number, number after the decimal point
quit to exit
get help:
--help or --h
show the manual:
eg:man date
open text editor:
nano text.txt
check who login: who
check who login: w
net state: netstat -a
the program runs: ps -aux
change to be root identity:su - 
change to another identity:eg: su - nodemanager
Create a sudo user in CentOS
account information:/etc/passwd
password information:/etc/shadow
group information:/etc/group
File Permission:
https://tutonics.com/2012/12/linux-file-permissions-chmod-umask.html

d is for folder, – is for file, | is for link file, b is for equipment, c is for I/O equipment.

r:4, w:2,x:1

for folders, who only has read permission if there is no x(execute), like r– cannot access the folder.x let you can access the folder, like when using cd xxx command.

for files, w permission enable you change the content, but cannot delete the file.

change the system language:

/etc/locale.conf

change the group the files belonged to, the group must in /etc/group: chgrp

eg: chgrp groupname xxx.txt

change the owner of the files, the owner must in /etc/passwd: chown -R will influence the sub folders and files

eg: chown -R ownername xxx.txt

change owner and group:

eg: chown ownername:gourpname xxx.txt

copy a file: cp

-i if there is the same one exists, system will ask your confirmation

cp -i sourcefile destination

-a make it totally the same including the permission information

-s make a shortcut

-u update the destination with newer file.

-d copy shortcut to shortcut

-l copy shortcut’s content(real one, not itself, can be neglected)

change the permission: chmod

eg: chmod -R 777 xxx.txt

some useful permission, for example:

-rwxr—–: chmod 740 filename

-rwxr-xr-x: chmod 755 filename

chmod u=rwx,go=rx filename

chmod u=rwx,g=rx,o=r filename

add all(u,g,o) writing permission:

chmod a+w filename

cancel all execute permission:

chmod a-x filename

create a new file:

touch xxx

delete file(-r includes every son):

rm -r xxx

read and show in command line(-n show line number):

eg: cat -n ~/.bashrc

show from tail to start:

eg: tac ~/.bashrc

show with line number:

nl -b a -n rz 1.txt

delete an empty folder(-p includes every parent empty folder):

rmdir -p xx/xx

go to home folder:

cd = cd~

back to the folder just now:

cd -

print environment path variable to screen:

echo $PATH

add a folder to PATH:

PATH="${PATH}:/root"

get basename:

basename /etc/sysconfig/network

get dirname:

dirname /etc/sysconfig/network

print content to search:

more 1.txt

less 1.txt

use /key word and ?keyword to search after and before, n to repeat the action, pageup and pagedown to turn pages, G go to the last line, g go to the first line, q quit less.

revert less:

tac xxx.csv | less

show head 100 line:

head -n 100 1.txt

excludes the last 100 line:

head -n -100 1.txt

show tail 100 line:

tail -n 100 1.txt

excludes the first 100 line:

tail -n +100 1.txt

show if there is new data input:

tail -f 1.txt

show 11 line to 20 line:

head -n 20 1.txt | tail -n 10

meanwhile show the correct line number:

cat -n 1.txt | head -n 20 | tail -n 10

show the different character code result:

eg: od -t oCc 1.txt

eg: echo testword | od -t oCc

show the mtime(content modifying time) of the files:

ll

show the atime(access time) of the files:

ll --time=atime

show the ctime(change time, state of files, cannot be changed) of the files:

ll --time=ctime

create a new file with a certain mtime:

touch -t 202107041412 xxx.txt

default permission setting:

umask

umask -S

umask means needs to deduct from the max permission:

eg: for folders: 777(drwxrwxrwx) – umask number

for files: 666(-rw-rw-rw-) – umask number

change umask default number:

umask 002

show the hide attributes(-a, -d, -R):

lsattr xxx

change the hide attributes(+a, +i, -a, -i):

chattr +a xxx

SUID(4, u+s): special permission on execution file to make the executioner having owner permission in run-time.

-rwsr-xr-x

if s is S, that means as there is no x, it is meaningless

SGID (2, g+s) : special permission on file/folder to make the executioner having group permission in run-time.

SBIT (1, o+t) : special permission on folder to make only the root and owner can delete the sub folders or files.

to add suid, sgid, sbit, the method like below:

chmod 4755 filename

chmod g+s, o+t filename

get detailed information of file:

file xxx.rpm

search a command file(-a means not the first result, show all):

which -a command

check command installed or not:

eg: command -v sshfs

search a file(-l: list the folder will be checked, -b: only check binary file, -m: only check the file in manual path, -s: only check source file, -u: look for others file):

whereis -l filename

locate/updatedb:

-i(Case insensitive): locate -i partfilename

-c(output only the found number): locate -c partfilename

-l(output line number): locate -l 5 partfilename

-S(output db related information): locate -S partfilename

-r(show regex format): locate -r partfilename

updatedb can get the newest result.

find -mtime n:

find files >= 5days ago: find /var -mtime +4

find files <= 4days ago: find /var -mtime -4

find files 4-5days ago: find /var -mtime 4

-user, -group, -nouser, -nogroup

find the files under a folder which is belonged to a user: eg:

eg: find /home -user username

find a file having keyword:

eg: sudo find / -name "*xxx*"

eg: find / -name *.txt

find the number of a certain type:

find ./*.JPG -type f | wc -l

find a certain type file(s: socket, b,c: equipment, f:file, d: folder, l:link, p: FIFO):

eg: find /run -type s

eg: +, \; means finish

find ./ -type f -name mem* -exec cat {} +

find ./ -type f -name mem* -exec cat {} \;

find file with special permission:

eg: find / -perm /7000

find file size over 1M:

eg: find ./ -size +1M

eg: add -exec ls -l {} \; at last if continue to do some action

physical disk file: /dev/sd[a-p][1-128]

eg: /dev/sda1

virtual disk file: /dev/vd[a-d][1-128]

ext2 is indexed allocation

check the disk volume where a certain folder in(-i: show inode):

eg: df -hT ./

except tmpfs Filesystem, e.g: df -hT -x tmpfs

eg: xfs_quota -x -c "df -h" /home

/dev/shm/ is the folder using memory, usually volume is half of the memory

check the folder size:

eg: du -Sah ./

check all the 1st subfolders and files size(c is for summary):

sudo du -hsc ./*

list sorted results of the big 30:

sudo du -ahx ./ | sort -rh | head -n 30

check the folder size with n depth:

sudo du -h --max-depth n ./

similar to hard copy(-f: force): ln fileName shortcutName

similar to soft copy, making link (-f: force) : ln -s fileName shortcutName

check the disk partition state:

lsblk -fp

check partition table type:

parted /dev/sda print

MBR uses fdisk, GPT uses gdisk

eg: gdisk /dev/sda

display partitions: sudo fdisk -l

refresh partition without reboot: partprobe -s

formatting:

sudo mkfs.ext4 /dev/sda

https://phoenixnap.com/kb/linux-format-disk

mkfs.xfs /dev/sda4

mkfs -t xfs -f /dev/sda4

can be used by Linux and windows: sudo mkfs.exfat -n "label" /dev/sdb1

to install mkfs.exfat:

sudo apt-get install exfatprogs

formatting to FAT32: sudo mkfs.vfat -v -I -F 32 /dev/sdb4

can be used by Linux and windows(single file max 4GB):

sudo mkfs.vfat -I /dev/sda

change the label of FAT32 disk: fatlabel /dev/sdb4 UDISK

change the label: sudo e2label /dev/sda labelName

https://stackoverflow.com/questions/16956810/how-do-i-find-all-files-containing-specific-text-on-linux

check the cpu core number:

grep 'processor' /proc/cpuinfo

check xfs file system(should in unmounted state, when the system is in trouble): xfs_repair -n /dev/sda4

mount a partition:

eg: mount UUID="5748de1d-9e6c-420d-ba04-6253d083e414" ./emptyFolderName

mount with a special permission information: eg:

sudo mount -t exfat -o umask=0022,gid=groupID,uid=userID /dev/sda1 /home/user/somewhere

see: Mount device with specific user rights

mount with a certain language code:

eg: mount -o codepage=950,iocharset=utf8 UUID="35BC-6D6B" /data/usb

when the root is read-only, you need to do remount:

mount -o remount,rw,auto /

mount -n -o remount,rw /

mount a certain folder to another:

https://linuxconfig.org/howto-mount-usb-drive-in-linux

eg: sudo mount --bind /home/userName/mountTest /home/userName/SImA/SImA-1.1.10/migration

unmount a device(-f: force):

eg: umount /run/media/user/U

change the xfs disk’s label(-l is to show, -u is to show UUID, -U is to use UUID):

eg: xfs_admin -L labelname /dev/sdb4

generate a new UUID: uuidgen

to change uuid and label for ext4, use tune2fs, eg: tune2fs -L labelname /dev/sdb4

to mount automatically, change the content in:

/etc/fstab

to mount dvd.iso files:

eg: mount -o loop /tmp/xxx.iso /data/xxx

to mount a big file: eg: mount -o loop UUID=”xxx“ /mnt

check free memory in detail: free -h

total memory: grep MemTotal /proc/meminfo

check swap equipment in detail: swapon -s

grep SwapTotal /proc/meminfo

.zip file unzip:

unzip -P password xxx.zip -d ./targetFolder/

check the content in zip file:

unzip -l xxx.zip

zip a file(-v show the detail information, -d unzip, -1: quick but lower compressed, -9: slow but well compressed, default is 6, -c: show to screen and can be redirected):

eg: gzip -v textfile

eg: gzip -d testfile.gz

eg: gzip -9 -c xxx > xxx.gz

unzip img.gz:

gunzip xxx.img.gz

show the zip file’s content:

eg: zcat xxx.gz

find the content in zipped file:

eg: zgrep -n ‘anycontent‘ xxx.gz

bzip2(-k is to remain the original one) is more compressed than gzip, command is almost the same.

eg: bzip2 filename

show the zip file’s content:

eg: bzcat filename.bz2

xz(-v show detailed information, -k remain the oringal one) is more compressed than bzip2

eg: xz filename

show the zip file’s content:

eg: xzcat filename.xz

unzip tgz file:

eg: tar zxvf xxx.tgz

use tar(-j for bz2, -J for xz, -z for gz, -p keep ther original permission, –exclude= for excluding unwanted one) to make zip folder:

tar -jcv -f filename.tar.bz2 object_folder1 object_folder2

to check what is inside:

tar -jtv -f -filename.tar.bz2

to unzip:

tar -jxv -f filename.tar.bz2 -C destination_folder

to unzip one in the zipped file:

tar -jxv -f filenme.tar.bz2 thatFile

to unzip .tar.gz file: eg:

tar -xvzf shga_sample_750k.tar.gz

to unzip tar.xz file:

tar xf linux-3.12.2.tar.xz

to unzip .tar file, eg:

tar -xvf xxx.tar -C ./

view the contents of tar.gz:

tar -tf filename.tar.gz

back up xfs file system(level 0 means totall backup):

eg: xfsdump -l 0 -L boot_all -M boot_all -f /srv/boot.dump /boot

restore the xfs file system:

eg: xfsrestore -f /srv/boot.dump -L boot_all /tmp/boot

show the difference between two folders:

eg: diff --brief --recursive dir1/ dir2/

eg: diff -r /boot /tmp/boot

make iso file(-r: keep permission information, -V: label, -o: img filename, -m: exclude file or folders, -graft-point: divided separately by rules):

eg: mkisofs -r -V ‘labelname’ -o ./xxx.img -m ./excludefile -graft-point /a=./a /b=./b

check iso information:

eg: isoinfo -d -i ./xx.img

totally copy including the permission:

eg: rsync -a /run/media/a ./c

rsync -avz /backUpFolder userAccount@hostname:/backUpToFolder

refresh and copy the new files to the destination:

eg: rsync -ur --progress --info=progress2 source_folder/ destination_folder/

use like cp -a:

eg: rsync -ah --info=progress2 --info=stats2 source_folder/ destination_folder/

completely make a mirror:

eg: dd if="/etc/passwd" of="/tmp/passwd.back"

cpio can backup equipment file:

to backup, eg: find / | cpio -ocvB > /dev/st0

to restore, eg: cpio -idvc < /dev/st0

change the pure txt file from dos to linux based(-k: keep same mtime information, -n: remain original file):

eg: dos2unix -k -n sourcefilename destinationfilename

change the pure txt file from linux to dos based (-k: keep same mtime information, -n: remain original file) :

eg: unix2dos -k sourcefilename

change txt content from different language code(-f: from code, -t: to code):

eg: iconv -f big5 -t utf8 originalfilename -o newfilename

iconv --list to check all the support codes.

check support shell:

cat /etc/shells

cat /etc/passwd

check command history:

cat ~/.bash_history

show recent n lines history:

history n

Delete specific command No. n:

history -d n

Save changes:

history -w

to add the timestamp in history result, add the content below to .bashrc:

HISTTIMEFORMAT="%Y-%m-%d %T "

then repeat the command line n:

eg: !123

check short command:

alias

set a new short command:

eg: alias lm='ls -al'

cancel alias:

eg: unalias ll

check the command in detail:

eg: type -a ls

bash short key:

The List Of Useful Bash Keyboard Shortcuts

ctrl+u: delete left part

ctrl+k: delete right part

ctrl+a: to the first

ctrl+e: to the end

cancel environment variable: eg: unset xxx

add path environment variable:

eg1: PATH=$PATH:/home/dmtsai/bin

eg2: PATH="$PATH":/home/dmtsai/bin

eg3: PATH=${PATH}:/home/dmtsai/bin

make subprocess use the variable:

export variablename

show all the environment variable:export

generate a random number: (1-100)eg:

declare -i number=$RANDOM*100/32768;echo $number

check current shell’s PID: echo $$

check the error code of last command: echo $?

show cpu and system edition:echo $MACHTYPE

show support locale:locale -a

let the user input the variable content(-p: hint sentence, -t: showing time(s)):

eg: read -p “Please input your name: ” -t 30 name

declare a int variable: eg: declare -i sum=1+2+3

show a variable attribute: eg: declare -p variable

delcare an array: eg: var[1]=”a“, var[2]=”b“…

show the current limit: ulimit -a

history max lines number: $HISTSIZE

show command order: eg: type -a ls

change bash welcome information: /etc/issue

change bash welcome information for remote login: /etc/issue.net

change additional welcome information, only root can: /etc/motd

for login shell: os check config file order: /etc/profile, ~/.bash_profile or ~/.bash_login or ~/.profile, ~/.bashrc

for non-login shell: os check config file: ~/.bashrc

set the config file and let it do some after logout bash: ~/.bash_logout

show the shortcut key: stty

stdout, stderr: eg: find /home -name .bashrc > list_right 2> list_error

stdout and stderr to the same file:

eg: find /home -name .bashrc &> list

eg: find /home -name .bashrc > list 2>&1

throw the content: eg: find /home -name .bashrc 2> /dev/null

stdin from the file: eg: cat > catfile < ~/.bashrc

define the end symbol: eg: cat > file << “eof“

if cmd1 pass, then do cmd2: cmd1 && cmd2

if cmd1 fail, then do cmd2: cmd1 || cmd2

to select by command1’s result: command1 && command2 || command3

get a certain command from a line(here 3 is the third one, 5 is the fifth one, c means choose by character):

eg: echo ${PATH} | cut -d ‘:‘ -f 3,5

eg: echo ${PATH} | cut -c 3-5

select keywords content out(-a: check binary file by text, -c: count found words, -i: ignore case, -n: with line number, -v: opposite selection, –color=auto: show with color):

eg: last | grep -v ‘reboot‘

sort the result(default sort by the first column, -k 2: sort by 2nd column, -n: sort by number, -M: sort by month, -f: ignore case, -b: ignore first space, -r: reversed order, -t: separation symbol, -u: if same just show one):

eg: last | sort -k 2

select out repeated data(-c: count, -i: ignore case):

eg: last | cut -d ‘ ‘ -f 1 | sort | uniq -c

how many lines, words, chracters in the content:

eg: cat /etc/passwd | wc -lwm

save while output(-a: add to the end of the original destination file):

eg: ls -l / | tee -a ~/homefile | more

replace words(-d: delete the words, -s: no repeated words): eg(a -> A): last | tr ‘[a-z]‘ ‘[A-Z]‘

replace tab by space: eg: cat /etc/man_db.conf | col -x | cat -A | more

replace tab by several spaces(-t: space number): eg: xxx | expand -t 6 filename

join by column: eg: join -1 2 -2 1 1st.txt 2nd.txt

https://shapeshed.com/unix-join/#:~:text=The%20join%20command%20in%20UNIX%20is%20a%20command%20line%20utility,is%20written%20to%20standard%20output.

simple join two file, default by tab(-d: default join symbol is tab): eg: paste file1 file2

split files(-b: unit size, like 1b,1kb,1mb, -l: line number): eg: split -b 300k filename prefixName

recover from split files: eg: cat prefixFile* >> finalFile

use for command can’t use pipe(-0: set for special separation symbol, -e: set for EOF, -p: need confirmation each time, -n: how many parameters each time it needs): eg: find /usr/sbin -perm /7000 | xargs ls -l

check user’s UID/GID information: eg: id root

check content lines in the file(-A: includes lines after, -B: includes lines before):

eg: dmesg | grep -n -A3 -B2 --color=auto 'memory'

check the kernel information: dmesg

select by regular express(3,$d means from 3 until last line delete): eg: nl regular_express.txt | sed '3,$d'

replace by several lines(line 2-5 are replaced by xxx):

eg: nl regular_express.txt | sed '2,5c xxx'

select out several lines(line 2-5 are selected):

eg: nl regular_express.txt | sed -n '2,5p'

insert content into lines(xxx is inserted after line2):

eg: nl regular_express.txt | sed '2a xxx'

insert content into lines(xxx is inserted before line2):

eg: nl regular_express.txt | sed '2i xxx'

to replace some words(-i: sed -i… means directly change on that file and save automatically):

eg: filecontent | sed 's/wordsNeedToBeReplaced/newWords/g'

find all files containing specific text in a folder:

grep -rnw './' -e 'searchPattern'

egrep means grep -E, can use advanced regular express, eg: egrep -v ‘^$|^#’ regular_express.txt

extract content by column(the eg is 1 and 4 col, NF: how many column it has, NR: current row, FS: separation symbol): eg: who | awk '{print $1,$4}'

eg: cat /etc/passwd | awk 'BEGIN {FS=":"} $3<10 {print $1 "\t" $3}'

show column, -F means delimiter, $NF means last column, $1 means first column: eg:

cat /etc/passwd | awk -F ':' '{print $1, $NF}'

compare file by line, usually for ASCII pure text(-b: neglect blank, -B:neglect blank line, -i: ignore case): eg:

diff -bBi file1 file2

compare file by byte, can be used for execution file(-l: show all difference):

cmp -l file1 file2

make patch:

eg: diff -Naur file1 file2 > result.patch

refresh to new file(N means nth folder, if in the same folder N is 0): eg: patch -pN < patchFile

restore to old file: eg: patch -R -pN < patchFile

shell script starts with which bash you want to use: eg: #!/bin/bash

run shell script in this bash: eg: source test.sh

run shell script in son-bash: eg: sh test.sh

test file exist: eg: test -e filename

https://www.computerhope.com/unix/test.htm

check open service ports: netstat -tulnp | grep -n LISTEN

check shell script: eg: sh -n xxx.sh

show shell script before execute: eg: sh -v xxx.sh

show shell script used: eg: sh -x xxx.sh

show current user belonged groups: groups

switch to new group(exit to go back): newgrp groupName

register new account: useradd xxx

change password: passwd userName

show password information: chage -l userName

delete user account(-r: include home): userdel -r username

change shell(-l: show available shell): eg: chsh -s /bin/csh

add group: groupadd groupName

delete group: groupdel groupName

set group password(-A: make user become group administrator): gpasswd groupName

check ACL permission: https://segmentfault.com/a/1190000022541406

getfacl filename

use other user to implement command: eg: sudo -u userName touch xxx

Creating a Sudo-Enabled User

make users and groups having root power automatically:

change /etc/sudoers, use the below:

sudo visudo

add sth like, eg:

root ALL=(ALL) ALL

%wheel ALL=(ALL) ALL

put user into a group: eg: usermod -aG groupName userName

remove user from a group:eg: gpasswd -d userName groupName

check login log: lastlog

restart atd(for one time) service: systemctl restart atd

start while power on: systemctl enable atd

check current state of atd: systemctl status atd

check whether daemon is enabled or not: systemctl is-enabled docker.service

execute scheduled task: at now + 2 minutes, echo “test” > /dev/pts/0, ctrl+d

show current task: atq

delete current task: atrm numberID

check cpu consumption: uptime

check cycled scheduled task: crontab -l

set scheduled task: crontab -e

eg(every 1 minute): */1 * * * * echo "test" > /dev/pts/0

you can change it here: /var/spool/cron/userName

check scheduled task log: cat /var/log/cron

check process state: ps -l

the maxlogins connection is written in: /etc/security/limits.conf

pause a process: ctrl+z

show the background jobs(-r: show only running jobs, -s: show only stopped jobs):

jobs -l

bring background task to foreground: eg: fg %1

start task again in background : eg: bg %1

kill a task directly: eg: kill -9 1

kill a task normally: eg: kill -15 1

reboot a pid process: eg: kill -1 1

kill pid by name:eg: killall -i -9 bash

process persistent in background even after shell dies accidentally: eg: nohup pycharm.sh &

static check the process related to this bash: ps - l

static check all the process: ps aux

dynamic (every 1s)check all the process: top -d 1

process tree: pstree -Aup

check process’s pid: ps aux | grep 'processName' | grep -v 'grep' | awk '{print $2}'

check if the process has restarted: tail -5 /var/log/messages

create a process with a certain nice value:eg: nice -n -5 vim &

change the nice value: eg: renice -5 PIDNumber

check the listening port: netstat -tulnp

dynamic check the hardware information every 1 second(-d: harddisk state): vmstat 1

check what is using the file: eg: fuser -muv /proc

check what is using the file then kill it: eg: fuser -mki /home

find user is using which file: eg: lsof -u username -a

find folder is used by which process: eg: lsof +d /dev

check pid number of process name: eg: pidof systemd rsyslogd

check the SELinux permission of this folder: ls -Z

check process SELinux information: ps -eZ

current SELinux state: getenforce

SELinux policy(/etc/selinux/config): sestatus -vb

getsebool -a

change selinux permission: eg: setsebool -P httpd_enable_homedirs 1

recover default SELinux permission: eg: restorecon -Rv /etc/cron.d

check default SELinux permission setting(-a: add context, -m: mend context, -d: delete context): semanage fcontext -l

check how the port is managed by selinux:

eg: sudo semanage port -l | grep 22

add a port open in selinux:

sudo semanage port -a -t ssh_port_t -p tcp yourPortNumber

delete a port open in selinux:

sudo semanage port -d -t ssh_port_t -p tcp yourPortNumber

check installated software: eg: rpm -qa | grep setroubleshoot

start service:

eg: systemctl start atd.service

stop service:

eg: systemctl stop atd.service

restart service:

eg: systemctl restart atd.service

refresh service config without restart:

eg: systemctl reload atd.service

start service automatically while start os:

eg: systemctl enable atd.service

enable service and start meanwhile:

eg: systemctl enable --now docker

disable automatical start while start os:

eg: systemctl disable atd.service

check the state of the service:

eg: systemctl status atd.service

force to disable the service:

eg: systemctl mask cups.service

recover the forced disabled service:

eg: systemctl unmask cups.service

check all the service on the os:

systemctl list-units --all

systemctl list-unit-files -all

systemctl list-unit-files --type=service

check which mode you are using:

systemctl get-default

change mode to graphic when start os:

sudo systemctl set-default graphical.target

change mode to pure command when start os:

sudo systemctl set-default multi-user.target

swap the mode without reboot os:

sudo systemctl isolate graphical.target

sudo systemctl isolate multi-user.target

check the dependencies between services:

sudo systemctl list-dependencies

check the socket service:

systemctl list-sockets

check service with its port:

cat /etc/services

log for crontab in: /var/log/cron

log for import information or error: /var/log/messages

check the living log saved in memory:

journalctl -f

check the daemon log: eg:

journalctl -u sshd

journalctl -u docker.service --since "2022-10-05 10:10:00"

check the loaded kernel module: lsmod

check a certain kernel module information:eg: modinfo drm

load kernel module(-c: list, -r: remove): eg: modprobe vfat

show network card information: nmcli connection show

check hostname information: hostnamectl

eg: hostname -f

change hostname: eg: hostnamectl set-hostname test.local

show time information in detail: timedatectl

change timezone: eg: sudo timedatectl set-timezone "Asia/Tokyo"

change the time: eg: timedatectl set-time "2021-08-25 17:52"

check the system locale: localectl

check the bash locale: locale

change the system locale:eg: localectl set-locale LANG=en_US.utf8

check the detailed hardware information: dmidecode -t 1

check usb state: lsusb -t

sudo lsusb -v -s busNumber:deviceNumber

refresh hardware instruction file: update-pciids

check the cpu and hard disk usage information: iostat -mt

mail is saved in: /var/spool/mail/

install gcc: yum groupinstall "Development Tools"

show information of groupinstall of sth: eg: yum groupinfo "Development Tools"

remove groupinstalled sth: eg: yum groupremove "Development Tools"

compile c file:

eg:gcc -O -c hello.c, then gcc -o hello hello.o

if used library: eg: gcc sin.c -lm -L/lib -L/lib64 -I/usr/include

check the related lib: eg: ldd -v /lib64/libc.so.6

to verify the file: eg: md5sum google-chrome-stable_current_x86_64.rpm

install by rpm: eg: rpm -ivh xxx.rpm

test possible to install for rpm: eg: rpm -ivh xxx.rpm --test

upgrade existed packages: eg: rpm -Fvh xxx.rpm

check already installed packages: rpm -qa

check the package information in detail: rpm -qi

check the pakcage installed directory information:rpm -ql

check the file is belonged to which package: eg: rpm -qf /bin/sh

verify installed package : eg: rpm -V logrotate

delete package: eg: rpm -e pam

refresh rpm database: rpm --rebuilddb

check software information: eg: yum info mdadm

check the software which can be updated: yum list updates

check a certain software state: eg: yum list chrome*

install a software: eg: yum install pam-devel

update a certain software: eg: yum update pam-devel

delete a certain software: eg: yum remove pam-devel

check firewall setting: firewall-cmd --list-all

open firewall: eg: firewall-cmd --add-service="http"

open firewall permanently: eg:

sudo firewall-cmd --permanent --add-service="http"

sudo firewall-cmd --permanent --add-port=portNumber/tcp

How to remove a port in firewall

How to check if a port is in use on Linux:

https://www.cyberciti.biz/faq/how-do-i-check-if-a-port-is-in-use-on-linux/

eg: sudo netstat -tulpn | grep LISTEN

sudo netstat -tulpn | grep :443

ss -tulpn

How to create a sudo user on centos:

https://www.digitalocean.com/community/tutorials/how-to-create-a-sudo-user-on-centos-quickstart

show current tty: tty

show current logged in users: w

show the mail stream on console:

eg: tail -f /var/spool/mail/username

How to share folder between host and vmware:

https://alexandrerosseto.medium.com/vmware-linux-how-to-share-folder-between-host-and-vm-62e63419ecbb

sudo vmhgfs-fuse .host:/sharedFolderName /mnt/hgfs/sharedFolderName -o allow_other -o uid=1000

check software installed on debian: apt list --installed

temporarily install in english environment: eg: LANG=en_US ./runInstaller

How to Set Up SSH Keys on Debian 10:

How to Fix Connection Refused by Port 22 Debian/Ubuntu

https://linuxize.com/post/how-to-set-up-ssh-keys-on-debian-10/

check the ssh log: journalctl -u sshd

check the failed login log: lastb -adF

check the login log: last

How to install and enable SSH server on SUSE:

https://www.simplified.guide/suse/enable-ssh

check the registered repos:

yum repolist all -v

repos saving directory: /etc/yum.repos.d

check running GUI environment:

echo $XDG_CURRENT_DESKTOP

curl set with proxy:

curlコマンドにてproxy設定

how to use pscp to copy file from host to guest:

https://superuser.com/questions/532919/how-to-use-pscp-to-copy-file-from-unix-machine-to-windows-machine-where-target-p

pscp.exe -pw MyPassword root@127.0.0.1:/etc/myfolder/myfile.opt "C:\download files"

you can put with putty session in a same folder and use:

pscp.exe -C -load “puttySessionName” “D:\xxx.zip”accountName@hostname:/home/accountName/xxx/

use wget to download from a list written in a file:

wget -i xxxx.txt

use wget to download with breakpoint continue(-c), rename the file(-O), assign the path(-P):

wget -c --no-check-certificate -O xxx.iso -P /home/xxx/Downloads/ https://xxxx.iso

How to configure wget for a proxy:

How to use wget behind a proxy

How to configure yum for a proxy:

yumのproxy設定(centOS 7)

set the signal which will affect the process:

eg: trap “killall background“ EXIT

https://stackoverflow.com/questions/360201/how-do-i-kill-background-processes-jobs-when-my-shell-script-exits

https://www.cnblogs.com/liuhedong/p/10663842.html

open the bluetoothctl shell:

https://linuxcommandlibrary.com/man/bluetoothctl#tldr0

bluetoothctl

add the content at the last line of a file: eg:

echo 'just a test!' >> ./test.txt

truncate file, empty the file content: eg:

sudo find /var/log -type f -name *.log -exec truncate -s 0 {} +

show block information and UUID: blkid

change the content in a file(-i to save, / or . is delimiter): eg:

sed -i 's/changeFromWord/changeToWord/' targetFileName.txt

echo "test" | sed 's/te/fir/'

sed 's./etc..' paths.txt

run sudo inside a script without password:

echo "sudoerPassword" | sudo -S yourCommand

How to Install xrdp on Ubuntu

force install by .deb file:

dpkg -i --force-depends xxx.deb

limit number of ssh login

check public IP address: curl ifconfig.me -s

How to install and enable EPEL repository on a CentOS/RHEL 7

How To Enable Remote Desktop Protocol Using xrdp on Ubuntu 22.04

securely delete files, directories, and block devices by overwriting their contents with random data(overwriting its contents 3 times with random data. The -v option will display progress information, and the -z option will perform a final overwrite with zeroes to hide the fact that the device was shredded.): eg:

sudo shred -n 3 -v -z /dev/sdb

back up image file: eg:

sudo dd if=/dev/mmcblk0 of=xxx.img bs=4M;sync

sudo dd if=/dev/mmcblk0 | gzip > xxx.img.gz

restore the image file to hard disk: eg:

sudo dd if=xxx.img of=/dev/mmcblk0 bs=4M;sync

gzip -dc xxx.img.gz | sudo dd of=/dev/mmcblk0 status=progress

show boot-up performance:

systemd-analyze blame
Make Ubuntu Not Go in Suspend When Laptop Lid is Closed
/etc/postfix/main.cf: No such file or directory
There are stopped jobs (on bash exit)
make a portal door:
eg: sudo sshfs -o IdentityFile=/home/ubuntu/.ssh/xxx.pem ubuntu@ipAddress:/home/ubuntu/remoteFolder localFoder/
unmount the portal door: 
eg: sudo fusermount -u ./localFoder
centos7 install special python version 
set sudoer account without password:
sudo vi /etc/sudoers
# like below:
%sudo  ALL=(ALL) NOPASSWD: ALL 

scan the change every 3 seconds and show the result:

eg: watch -d -n 3 'free -h'

check environment variables: env

kill the login session: sudo pkill -u userName

sudo pkill -t pts/0

port used by software name:

sudo lsof -i -P -n | grep LISTEN

tmux on Linux(CentOS7)

check entire tmux output log: tmux capture-pane -pS - | less

to test connection: eg: nc -v yourIP yourPort

check ufw status:

sudo ufw status numbered

enable ufw:

sudo ufw enable

reload firewall:

sudo ufw reload

delete rule in ufw:

sudo ufw delete IDNumber

add open port in ufw:

sudo ufw allow portNumber

sudo ufw allow portStart:portEnd/udp

sudo ufw allow portStart:portEnd/tcp

sudo ufw allow from 192.168.2.0/24 to any port portStart:portEnd proto tcp

sudo ufw allow from 192.168.2.0/24 to any port portStart:portEnd proto udp

to limit:

sudo ufw limit from 172.16.7.133 to any port 80 proto tcp

alow a certain IP address:

sudo ufw allow from 192.168.2.0/24 to any port portNumber

make a screen and export the log:

screen -L -S your_session_name

“crtl+a”, and “d” to detach the screen.

check the existing screen:

screen -ls

recover to the screen:

screen -r your_session_ID_or_name

if you copy and use the certs in other windows PC:

use powershell:

icacls.exe certName /reset
icacls.exe certName /grant:r "$($env:username):(r)"
icacls.exe certName /inheritance:r

How to do the CHMOD 400 Equivalent Command on Windows:

solve the dns issue:

sudo systemctl restart dhcpcd

show the MAC address:

ip link show

print header and last several lines:

(head -n 1 xxx.csv && tail -n 10 xxx.csv)

print header and last several lines with certain columns:

(head -n 1 xxx.csv | awk -F, -v OFS=',' '{print $3, $51}' && tail -n 10 xxx.csv | awk -F, -v OFS=',' '{print $3, $51}')


p7zip:

7z a -p[your-password] -mhe=on [archive-name].7z [files-to-archive]

7z a -tzip -p[your-password] [archive-name].zip [files-to-archive]

to unzip:

7z x -p[your-password] [archive-name].zip

7z x -p[your-password] [archive-name].rar

7z x -p[your-password] [archive-name].7z

ark -b -a [archive-name].rar

show the supported hostkeyalgorithm:

ssh -Q sig | tr '\n' ',' | sed 's/,$/\n/'

to enable the supported algorithm:

edit /etc/ssh/sshd_config, add PubkeyAcceptedAlgorithms +ssh-rsa at the bottom, then restart sshd: sudo systemctl restart ssh

edit /etc/ssh/sshd_config, add DenyUsers ubuntu at the bottom, then restart sshd to prohibit a certain user from login

show until to the 2nd folder:

tree -L 2 folder/

disable representation of a certain user in login:

sudo vi /var/lib/AccountsService/users/[userName]

then change SystemAccount to be true.

SystemAccount=true

create key and cert for https:

openssl genrsa -out serverName.key 4096
openssl req -x509 -new -key serverName.key -out serverName.pem -days 365

get free certs from Let’s Encrypt:

sudo apt-get install certbot
sudo certbot certonly --standalone -d [yourDomain]

use ImageMagick to make electronic signature:
convert input.jpg -fuzz 55% -transparent white output.png

transfer jpg to pdf:

convert image1.jpg image2.jpg image3.jpg output.pdf

clear the password in pdf:

qpdf --password=[YOUR_PASSWORD] --decrypt input.pdf output.pdf

list all tmux sessions:

tmux ls

kill the specific tmux session by name or ID:

tmux kill-session -t session-name

To split the PDF into individual pages:

pdfseparate x.pdf x_%d.pdf

test API speed:

curl -o /dev/null -s -w "%{time_starttransfer}\n" [API URL]

check the strength of wifi signal:

iwconfig | grep Signal

connect wifi by command:

sudo systemctl enable --now NetworkManager

# List all available Wi-Fi networks in the area.
nmcli dev wifi list

# Connect to a specified Wi-Fi network using its SSID and password.
nmcli dev wifi connect <SSID> password <password>

# Display a list of all active network connections, showing their status and other details.
nmcli con show

# Disconnect the specified network interface from its network. 
nmcli dev disconnect iface <interface_name>

Monitor partition disk activity:

How to Monitor Disk I/O performance in Linux

iostat -m -p nvme0n1

Check disk activity:

sudo iotop

Monitor network traffic:

sudo nethogs yourNetInterFaceName

Displays the current IP-to-MAC address mappings in the ARP cache for local network communication:

arp -a

display detailed information about file:

stat /path/to/file

download files in the FTP server:

wget -r --ftp-user=yourID --ftp-password='yourPassword' ftp://yourdomain.com:80 ./

hold and unhold apt upgrade for certain software (eg: vsc):

sudo apt-mark hold "code/stable"
sudo apt-mark unhold "code/stable"

check hold state:

apt-mark showhold

list top 10 memory-consuming processes:

ps -e -o pid,ppid,comm,%mem,rss,%cpu --sort=-%mem | head -10
ps -e -o pid,ppid,comm,rss,%cpu --sort=-rss | head -n 10 | awk 'BEGIN {printf "%-8s %-8s %-15s %-12s %-8s\n", "PID", "PPID", "COMMAND", "MEMORY", "CPU%"}
NR>1 {printf "%-8d %-8d %-15s %-10.2fGB %-8.1f\n", $1, $2, $3, $4/1024/1024, $5}'

conduct a real-time test of the USB camera:

ffplay /dev/video0

This stores crash data files:

/var/lib/apport/coredump

Check which process is using port:
lsof -i:portNumber

Kill the process occupying port in one command:
fuser -k portNumber/tcp

Fix UTF-8 Locale

If Chinese filenames are displayed as escaped characters such as $'\345\...' or ????, check the current locale with locale. Setting LANG to en_US.UTF-8 allows Linux tools such as ls to correctly recognize and display UTF-8 filenames.

Add the following line to ~/.profile so the setting is applied automatically after login and remains effective after a reboot:

export LANG=en_US.UTF-8

Prevent /dev/shm Cleanup on Logout

Ubuntu may delete user-owned /dev/shm files at logout because systemd-logind defaults to RemoveIPC=yes.

Set RemoveIPC=no under [Login] in /etc/systemd/logind.conf.d/*.conf, then reboot. Files still disappear after a system reboot.

offline install python packages

paste the whl files folder named python to the path C:\temp(in req.txt named the main modules you want to install), and go to the python.exe directory which you want to install on:

python -m pip install -r "C:\temp\python\req.txt" --no-index --find-links file://"C:\temp\python"

or to the path and:

for %x in (*.whl) do python -m pip install %x

by the way, using proxy(2 dashes before proxy):

pip install modulename --proxy http://user:password@proxyserver:port

Mysql Commands

to login: mysql -u username -p

check mysql database stored in : select @@datadir;

show all the databases: show databases;

use a certain database: use DBNAME;

show all the tables: show tables;

show the create time of a certain table in a certain database:

SELECT create_time FROM INFORMATION_SCHEMA.TABLES WHERE table_schema = 'databasename' AND table_name = 'tablename';

show the last modified time:

SELECT update_time FROM INFORMATION_SCHEMA.TABLES WHERE table_schema = 'databasename' AND table_name = 'tablename';

give the privilege of a certain user:

GRANT ALL ON *.* TO 'username'@'localhost' IDENTIFIED BY 'password';

to check the max connection times per hour:

https://fromdual.com/max-used-connections-per-user-account

SELECT User, Host, max_connections, max_user_connections
FROM mysql.user;

show the grants for current user: SHOW GRANTS FOR CURRENT_USER;

create database:

create database databasename;

drop database:

DROP DATABASE databasename;

Create a new user:

CREATE USER userName IDENTIFIED BY 'newpassword';

knowledge in Spotfire

jar driver is in the folder below:

tibco\tss\7.9.0\tomcat\lib

or

tibco\tss\7.9.0\tomcat\webapps\spotfire\WEB-INF\lib

the upgrade tool UIconfig which locates in tibco\tss\10.10.0\tools\upgrade, may sometimes need:

Vc_redist.x64.exe and Vc_redist.x86.exe

XML View tab in configuration tool shows all the configuration, and open it by the path:

tibco\tss\7.9.0\tomcat\spotfire-bin\uiconfig.bat

after upgrading, the data functions need to be trusted, use the command below(if memory is not enough, using single thread, befor auto and single, it’s 2 -):

tibco\tss\10.3.10\tomcat\spotfire-bin>config find-analysis-scripts --auto-trust-data-functions=true --single-threaded

you can check the trust and untrust scripts, report in tibco\tss\10.3.10\tomcat\spotfire-bin\find-analysis-scripts>

to keep the weplayer’s language same with the visitor’s language:

tibco\tss\10.3.10\tomcat\webapps\spotfire\WEB-INF>
copy ResourcesHeader.properties and ResourcesWeb.properties, and then rename it and add ‘_en_US‘ at last

need to configure the configuration tab->join database in configuration tool after configuring the upgrade tool

ChemDraw-JS-Setup-18.1.1.exe for only 1, JS includes the ChemDraw ActiveX
ChemDraw ActiveX Enterprise Constant.zip for 2 more, and it is a must for the webplayer server. Must reinstall the CDAX manually if it is also used as a webplayer server meanwhile.

spotfire_webclipboard_setup.exe needs to transfer the installed content to the right folder like tibco\tss\10.3.10\tomcat\webapps\ROOT\webclipboard, you need to check the version in the path is correct or not

to open the anonymous authentication:

  1. configuration tool->configuration->anonymous authentication->Yes
  2. by command prompt, in path: \tibco\tss\10.3.10\tomcat\spotfire-bin>config enable-user --username=ANONYMOUS\guest
  3. let anonymous user (a subgroup)in a certain group having spotfire consumer licences
  4. making a folder in library, let anonymous user access possible

to deal with the problem that two different version installed in same server, the node manager may use the old one(basically step 3 and 4 is enough):

tip: the first node ID information line is for nodemanager, the second node ID line is for spotfire server.

  1. check the antivirus block list
  2. check the spotfire_db.nodes in database and found the old version’s ID number.
  3. to check the nodes ID, by command prompt: \tibco\tss\10.3.10\tomcat\spotfire-bin>config list-nodes
  4. by command prompt: \tibco\tss\10.3.10\tomcat\spotfire-bin>config delete-node --id=xxxxxxx
  5. change the content in \tibco\tsnm\10.3.10\nm\config\nodemanager.properties, and restart node manager

to link well with chemical db which is to save chemical structure, we must change the configuration by the commands below in command prompt(space below –value):

tibco\tss\10.3.10\tomcat\spotfire-bin>

1.config.bat export-config --force
2.config set-config-prop --name=information-services.parameter-expression-validation --value=false
3.config import-config -c "disable iim validation"

config commands:

https://docs.tibco.com/pub/spotfire_server/7.13.0/doc/html/TIB_sfire_server_tsas_admin_help/GUID-2F0618ED-0B02-4065-9364-F76C2A8F0C9C.html

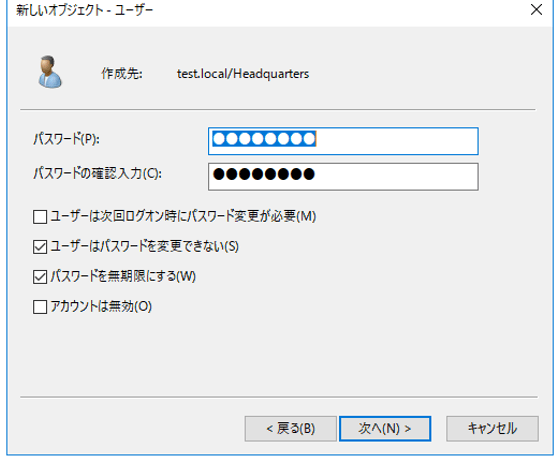
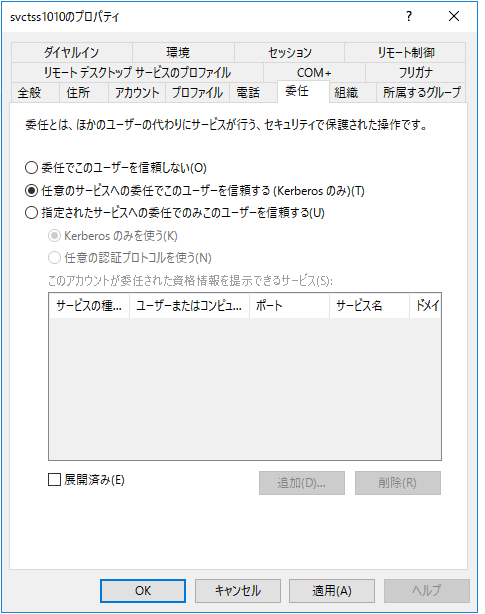
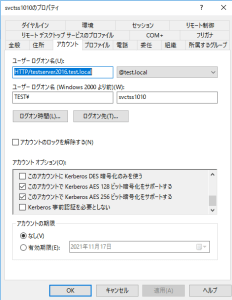
Windows service account should set to be an AD controlled account for node manager(webplayer), so that the webplayer can get the information from not only the local but also its neighbours’

eg: domain name/web player ad account

to set the default saving path when save file in the library:

UI config -> Configuration Tab->Public Address:

Enable custom public address:Yes

Public address URL: spotfire server full name

when under active directory, to give the node manager ability to visit other server’s file

windows server 2012
->
server manager-> computer administration->system tool->
local user and group-> group-> Administrators
->double click->add the ad account to local

spotfire use the map source in: https://geoanalytics.tibco.com/

export (command: tibco/tss/10.3.10/tomcat/spotfirebin->config export-service-config –capability=WEB_PLAYER –deployment-area=XXX) and set the Spotfire.Dxp.Worker.Host.exe.config file in path:\tibco\tss\10.3.10\tomcat\spotfire-bin\config_Web Player\root, and import it, insert the userid and password, eg:

<!-- Proxy authentication settings. -->
<!-- To use these, you need to add a proxy section, including the proxy address,  to section "system.net/defaultProxy/" below. -->
<setting name="ProxyUsername" serializeAs="String">
<value>USERID</value>
</setting>
<setting name="ProxyPassword" serializeAs="String">
<value>PASSWORD</value>
</setting>
<!--Authentication settings for TIBCO Spotfire Statistics Services -->
<!-- A list of URLs -->

also add in:

<system.net>
<defaultProxy enabled="true">
<bypasslist></bypasslist>
<proxy scriptLocation="http://XXXXXXXXXX.pac"/ >
</defaultProxy>
</system.net>

and remeber to use it in webplayer

copy the matplotlib additional files tcl8.6, tk8.6 to the spotfire’s/nodemanager’s inside python/Lib folder if you want to use the text area to plot

settings when using active domain controller:

1.use administrator account to login the win server

2.lsnrctl stop the listner, and stop the service

3.set the oracle’s service using administrator to log on

eg: OrcaleServiceORCL, OracleOraDB19Home1TNSListener, OracleVssWriterORCL

4.then change the listener.ora and tnsnames.ora in the path below C:\app\oracle\product\19.3.0\dbhome_1\network\admin

for listener.ora:

LISTENER =
(DESCRIPTION_LIST =
(DESCRIPTION =
(ADDRESS = (PROTOCOL = TCP)(HOST = testserver2016.test.local)(PORT = 1521))
(ADDRESS = (PROTOCOL = IPC)(KEY = EXTPROC1521))
)
)

for tnsnames.ora:http://blog.sina.com.cn/s/blog_7c0e26230100t0ci.html

ORCL =
(DESCRIPTION =
(ADDRESS = (PROTOCOL = TCP)(HOST = testserver2016.test.local)(PORT = 1521))
(CONNECT_DATA =
(SERVER = DEDICATED)
(SERVICE_NAME = orcl)
)
)

5. then restart the service above(OrcaleServiceORCL, OracleOraDB19Home1TNSListener, OracleVssWriterORCL)

6.change:

set CONNECTIDENTIFIER=//testserver2016.test.local/ORCL

in the sql script

7.then go on the normal installment

need to set the spotfire server address into trust sites of IE after installing Analyst immediately on server:

https://community.tibco.com/questions/error-occurred-while-logging

LDAP configuration in Spotfire:

https://docs.tibco.com/pub/spotfire_server/10.10.2/doc/html/TIB_sfire_server_tsas_admin_help/server/topics/configuring_ldap.html

in addition:

  1. tick Authentication and User directory, choose Microsoft Active Directory
  2. LDAP username: eg: Test\Administrator
  3. LDAP server URL: eg: ldap://testserver2016.test.local:389
  4. Context names: here, the OU means the accounts you want to use belonged to, eg: OU=XXX,DC=test,DC=local

https://docs.microsoft.com/en-us/previous-versions/windows/desktop/ldap/distinguished-names#:~:text=The%20LDAP%20API%20references%20an,a%20UTF%2D8%20string%20format

use LDAP Browser to find a certain OU(build it and search a certain account name to find its upper OU): https://www.ldapadministrator.com/resources/english/help/la20121/ch08s01.html

to list and get the node manager service infromation:

go to cmd:

C:\tibco\tss\10.3.9\tomcat\spotfire-bin>config list-service-configs

to delete the node manager service:

C:\tibco\tss\10.3.9\tomcat\spotfire-bin>config delete-service-config --config-name=servicename

in default communication configuration between AP server and nodemanager server, the port 9443 is for https implement communication, and 9080 is the base layer for http

if using oracle pdb‘s instance:

in batch file:

the instance name should be: //localhost/orclpdb

and when import the dump file, you need to put it into the random folder it made, like app/oracle/admin/orcl/dpdump/F2BBAEADB6274F34AFBAEC1772546E79

for JA16SJISTILDE, need to having the driver of orai18n.jar

The module for installation is in the path, such as the Visual C++ installer:

C:\Program Files(x86)\TIBCO\Spotfire\10.3.3\Modules\Lead Discovery_8.3.0.410\VCRedist

Default Firewall Settings:

in spotfire server:

open for human users: 80

open for nodemanager(backend):9080(for http), 9443(for https)

in nodemanager server:

open for spotfire server: 9081,9444

open for webplayer: 9501

* open for chemdraw: 81

Cannot open information link bug will happen if in UIconfig, data source template has the same name:

eg:《jdbc-type-setting》《type-name》XXX《/type-name》, XXX should not be the same.

method to change content in uiconfig by command:

1. output the saved state:

uiconfig->Export configuration from database->Load configuration from files

2. edit the xml files and import it.

eg: go to spotfire-bin directory, and use command: config import-config config.xml –comment=”disable postgreSQL”

Port 9005 will be used by spotfire, if it cannot be used, the service will stop automatically.

export library by command(default domain is SPOTFIRE):https://docs.tibco.com/pub/spotfire_server/10.10.4/doc/html/TIB_sfire_server_tsas_admin_help/server/topics/export-library-content.html

eg:

config export-library-content --tool-password=pw --file-path=C:/outputfilename --item-type=all_items --user=spotfire@SPOTFIRE --include-access-rights=true --library-path="/Test for case have space"

import library by command eg:

config import-library-content --tool-password=pw --file-path="C:/outputfilename.part0.zip" --item-type=all_items --user=spotfire@SPOTFIRE --conflict-resolution-mode=KEEP_NEW --include-access-rights=true --library-path="/"

change the nodemanager domain information in:

tibco\tsnm\10.3.9\nm\config\nodemanager.properties

change the nodemanager’s instances domain information in:

tibco\tsnm\10.3.9\nm\config\config.json

change domain information for the spotfire server is required change the information in:

app\oracle\product\19.3.0\dbhome_1\network\admin\listener.ora

and

app\oracle\product\19.3.0\dbhome_1\network\admin\tnsnames.ora

and then restart the oracle service: OracleOraDB19Home1TNSListener,OracleServiceORCL

how to check the end users’ using webplayer frequent:

\tibco\tsnm\7.11.7\nm\logs\AuditLog

trust all scripts, template, data functions:

config find-analysis-scripts -t spotfire -s true -d true -q true --single-threaded

to make the spotfire webconsole page in https, you need ssl certificate, the example to make the .jks file is:

C:\tibco\tss\10.10.4\jdk\bin>keytool -genkey -alias servername -keyalg RSA -keypass pw -storepass pw -keystore keystore.jks

then move this jks file to C:\tibco\tss\10.10.4\tomcat\certs

Stop the server service, then edit C:\tibco\tss\10.10.4\tomcat\conf\server.xml, hide the http block, recover the https block, change information like:

    <Certificate certificateKeystoreFile="./certs/keystore.jks"
                 certificateKeystorePassword="pw"
                 certificateKeystoreType="jks"/>

must delete the content below!

truststoreFile=”./certs/testserver2016.jks”
truststorePass=”changeit”
truststoreType=”jks”

at last restart the server service.

change to be DNS:

config switch-domain-name-style –tool-password=pw –new-domain-name-style=dns

How to make Kerberos Authentication:

AD User and Computer:

C:\Users\Administrator>setspn -S HTTP/testserver2016 svctss1010

C:\Users\Administrator>setspn -S HTTP/testserver2016.test.local svctss1010

C:\Users\Administrator>setspn -l svctss1010

check 128 and 256 support

C:\Users\Administrator>ktpass /princ HTTP/testserver2016.test.local@TEST.LOCAL /ptype krb5_nt_principal /crypto ALL /mapuser svctss1010 /out spotfire.keytab -kvno 0 /pass yourpassword

Paste spotfire.keytab to C:\tibco\tss\10.10.4\tomcat\spotfire-config

Edit C:\tibco\tss\10.10.4\tomcat\spotfire-config\krb5.conf as follows:

[libdefaults]
default_realm = TEST.LOCAL
default_keytab_name = spotfire.keytab
default_tkt_enctypes = aes256-cts-hmac-sha1-96 aes128-cts rc4-hmac
default_tgs_enctypes = aes256-cts-hmac-sha1-96 aes128-cts rc4-hmac
forwardable = true

[realms]
TEST.LOCAL = {
kdc = testserver2016.test.local
admin_server = testserver2016.test.local
default_domain = test.local
}

[domain_realm]
.test.local = TEST.LOCAL
test.local = TEST.LOCAL

[appdefaults]
autologin = true
forward = true
forwardable = true
encrypt = true

C:\tibco\tss\10.10.4\jdk\bin>kinit.exe -k -t C:\tibco\tss\10.10.4\tomcat\spotfire-config\spotfire.keytab HTTP/testserver2016.test.local@TEST.LOCAL

Then delete the generated ticket for security reason.

In spotfire UIConfig, change the Authentication be Kerberos.

Then changes Domain Tab, Domain name style to be DNS, Parse user and domain name to be Yes.

C:\tibco\tss\10.10.4\tomcat\spotfire-bin>config switch-domain-name-style –tool-password=UIconfigpassword –new-domain-name-style=dns

Make sure Post Authentication Filter to be Block.

In Authentication:Kerberos Tab,

Service principal name to be:HTTP/testserver2016.test.local@TEST.LOCAL

Choose Keytab file and configuration file, Delegation policy Never, if the nodemanger and spotfire server in the same server.

Then save the change in uiconfig.

In client side, IE properties, add in the server site into local intranet site,

click customized level, at the lase choose only automatically login in intranet,

in detail setting tab, make sure you checked use Windows authentication.

restart the spotfire service, now you should login without input password.

synchronize ldap group information without reboot the server service:

spotfire-bin>config list-users -f

Error when running Information links using On-Demand with more than 1000 values in TIBCO Spotfire version 11.4.0/11.4.1/10.10.5/10.10.6

https://support.tibco.com/s/article/Error-when-running-Information-links-using-On-Demand-with-more-than-1000-values-in-TIBCO-Spotfire-version-11-4-0-11-4-1-10-10-5-10-10-6

Opening multiple TIBCO Spotfire Analyst client sessions on the same machine causes the previous Analyst session to ask for login prompt:

https://support.tibco.com/s/article/Opening-multiple-TIBCO-Spotfire-Analyst-client-sessions-on-the-same-machine-causes-the-previous-Analyst-session-to-ask-for-login-prompt

to refresh the AD information and shown in spotfire(no need to restart the spotfire service):

https://support.tibco.com/s/article/Tibco-KnowledgeArticle-Article-42505

config.bat list-users -f

communicate between Spotfire Server and Node Manager without going through a proxy, you need to refresh the configure file for web player, append the red part, and grey is optional:

 <system.net>

       <defaultProxy enabled="true"> 

        <bypasslist>

            <add address="Service IP, like web Player, Python Service, etc." /> 

        </bypasslist>

        <proxy bypassonlocal="true" proxyaddress="Proxy Server IP" />

       </defaultProxy>

     </system.net>
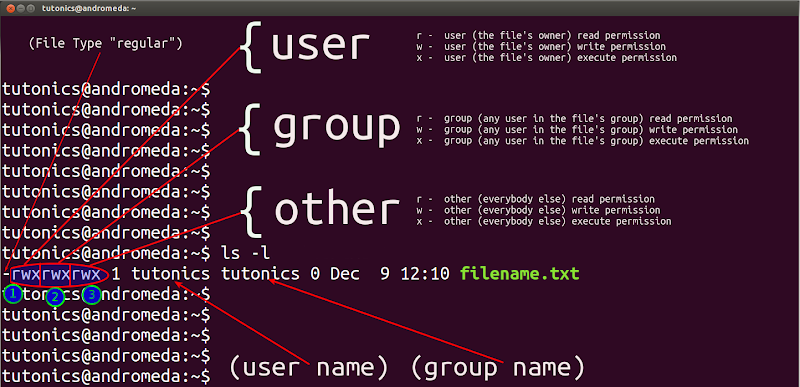
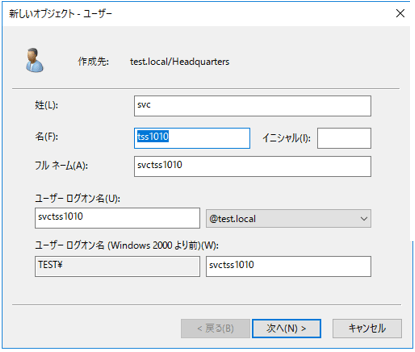
Configure Authentication Windows NT:

Authentication: BASIC Windows NT

User directory: Windows NT

Add Domains name, eg: test

Wildcard domain: Yes

Sleep time (minutes): 60

Domain name style: NetBIOS(e.g.RESEARCH)

Collapse domains: No

Parse user and domain name: Yes

Default domain: test

Creating the Spotfire SPK for Other Spotfire Analyst users

create the R package spk file for spotfire analyst(multcomp, foreign R package example):

library(SpotfireSPK)
install.packages(c("multcomp","foreign"))
writeLines("Packages: multcomp,foreign", "MySpotfireSPK1.dcf")
buildSPK("MySpotfireSPK1.dcf", "MySpotfireSPK1.spk")
cat(readLines("MySpotfireSPK1.dcf"), sep="\n")

export a certain config of webplayer:

\spotfire-bin>config export-service-config --config-name=webconfig2

export the active server configuration(configuration.xml):

config export-config --tool-passrod=yourPassword

import and activate the server configuration(configuration.xml):

config import-config --tool-password=yourPassword --comment=anyComment

command help, eg: config help import-config

preventing administrators from adding local users when using LDAP:

config set-config-prop --name=user-directory.allow-database-user-creation --value=false

export the config by the name: eg:

\tomcat\spotfire-bin>config export-service-config --config-name=webconfig2

Enabling the SSL connector on Spotfire Server

show login interface: Spotfire.Dxp.exe /forceshowlogindialog

open library version control:

config.bat  export-config --force -t yourPassword
config set-config-prop --name=library.versioning.enabled --value=true
config import-config -c "library-version" -t yourPassword

disable the check of the certs for Mods:

config.bat  export-config --force -t yourPassword
config set-config-prop --name=security.code-trust.validate-uploaded-cert --value=false
config import-config -c "trust-modes" -t yourPassword

search the files by size in library: content_size:>2MB

通过 WordPress.com 设计一个这样的站点
从这里开始