jar driver is in the folder below:
tibco\tss\7.9.0\tomcat\lib
or
tibco\tss\7.9.0\tomcat\webapps\spotfire\WEB-INF\lib
the upgrade tool UIconfig which locates in tibco\tss\10.10.0\tools\upgrade, may sometimes need:
Vc_redist.x64.exe and Vc_redist.x86.exe
XML View tab in configuration tool shows all the configuration, and open it by the path:
tibco\tss\7.9.0\tomcat\spotfire-bin\uiconfig.bat
after upgrading, the data functions need to be trusted, use the command below(if memory is not enough, using single thread, befor auto and single, it’s 2 -):
tibco\tss\10.3.10\tomcat\spotfire-bin>config find-analysis-scripts --auto-trust-data-functions=true --single-threaded
you can check the trust and untrust scripts, report in tibco\tss\10.3.10\tomcat\spotfire-bin\find-analysis-scripts>
to keep the weplayer’s language same with the visitor’s language:
tibco\tss\10.3.10\tomcat\webapps\spotfire\WEB-INF>
copy ResourcesHeader.properties and ResourcesWeb.properties, and then rename it and add ‘_en_US‘ at last
need to configure the configuration tab->join database in configuration tool after configuring the upgrade tool
ChemDraw-JS-Setup-18.1.1.exe for only 1, JS includes the ChemDraw ActiveX
ChemDraw ActiveX Enterprise Constant.zip for 2 more, and it is a must for the webplayer server. Must reinstall the CDAX manually if it is also used as a webplayer server meanwhile.
spotfire_webclipboard_setup.exe needs to transfer the installed content to the right folder like tibco\tss\10.3.10\tomcat\webapps\ROOT\webclipboard, you need to check the version in the path is correct or not
to open the anonymous authentication:
- configuration tool->configuration->anonymous authentication->Yes
- by command prompt, in path:
\tibco\tss\10.3.10\tomcat\spotfire-bin>config enable-user --username=ANONYMOUS\guest - let anonymous user (a subgroup)in a certain group having spotfire consumer licences
- making a folder in library, let anonymous user access possible
to deal with the problem that two different version installed in same server, the node manager may use the old one(basically step 3 and 4 is enough):
tip: the first node ID information line is for nodemanager, the second node ID line is for spotfire server.
- check the antivirus block list
- check the spotfire_db.nodes in database and found the old version’s ID number.
- to check the nodes ID, by command prompt:
\tibco\tss\10.3.10\tomcat\spotfire-bin>config list-nodes - by command prompt:
\tibco\tss\10.3.10\tomcat\spotfire-bin>config delete-node --id=xxxxxxx - change the content in
\tibco\tsnm\10.3.10\nm\config\nodemanager.properties, and restart node manager
to link well with chemical db which is to save chemical structure, we must change the configuration by the commands below in command prompt(space below –value):
tibco\tss\10.3.10\tomcat\spotfire-bin>
1.config.bat export-config --force
2.config set-config-prop --name=information-services.parameter-expression-validation --value=false
3.config import-config -c "disable iim validation"
config commands:
Windows service account should set to be an AD controlled account for node manager(webplayer), so that the webplayer can get the information from not only the local but also its neighbours’
eg: domain name/web player ad account
to set the default saving path when save file in the library:
UI config -> Configuration Tab->Public Address:
Enable custom public address:Yes
Public address URL: spotfire server full name
when under active directory, to give the node manager ability to visit other server’s file
windows server 2012
->
server manager-> computer administration->system tool->
local user and group-> group-> Administrators
->double click->add the ad account to local
spotfire use the map source in: https://geoanalytics.tibco.com/
export (command: tibco/tss/10.3.10/tomcat/spotfirebin->config export-service-config –capability=WEB_PLAYER –deployment-area=XXX) and set the Spotfire.Dxp.Worker.Host.exe.config file in path:\tibco\tss\10.3.10\tomcat\spotfire-bin\config_Web Player\root, and import it, insert the userid and password, eg:
<!-- Proxy authentication settings. -->
<!-- To use these, you need to add a proxy section, including the proxy address,  to section "system.net/defaultProxy/" below. -->
<setting name="ProxyUsername" serializeAs="String">
<value>USERID</value>
</setting>
<setting name="ProxyPassword" serializeAs="String">
<value>PASSWORD</value>
</setting>
<!--Authentication settings for TIBCO Spotfire Statistics Services -->
<!-- A list of URLs -->
also add in:
<system.net>
<defaultProxy enabled="true">
<bypasslist></bypasslist>
<proxy scriptLocation="http://XXXXXXXXXX.pac"/ >
</defaultProxy>
</system.net>
and remeber to use it in webplayer
copy the matplotlib additional files tcl8.6, tk8.6 to the spotfire’s/nodemanager’s inside python/Lib folder if you want to use the text area to plot
settings when using active domain controller:
1.use administrator account to login the win server
2.lsnrctl stop the listner, and stop the service
3.set the oracle’s service using administrator to log on
eg: OrcaleServiceORCL, OracleOraDB19Home1TNSListener, OracleVssWriterORCL
4.then change the listener.ora and tnsnames.ora in the path below C:\app\oracle\product\19.3.0\dbhome_1\network\admin
for listener.ora:
LISTENER =
(DESCRIPTION_LIST =
(DESCRIPTION =
(ADDRESS = (PROTOCOL = TCP)(HOST = testserver2016.test.local)(PORT = 1521))
(ADDRESS = (PROTOCOL = IPC)(KEY = EXTPROC1521))
)
)
for tnsnames.ora:http://blog.sina.com.cn/s/blog_7c0e26230100t0ci.html
ORCL =
(DESCRIPTION =
(ADDRESS = (PROTOCOL = TCP)(HOST = testserver2016.test.local)(PORT = 1521))
(CONNECT_DATA =
(SERVER = DEDICATED)
(SERVICE_NAME = orcl)
)
)
5. then restart the service above(OrcaleServiceORCL, OracleOraDB19Home1TNSListener, OracleVssWriterORCL)
6.change:
set CONNECTIDENTIFIER=//testserver2016.test.local/ORCL
in the sql script
7.then go on the normal installment
need to set the spotfire server address into trust sites of IE after installing Analyst immediately on server:
https://community.tibco.com/questions/error-occurred-while-logging
LDAP configuration in Spotfire:
in addition:
- tick Authentication and User directory, choose Microsoft Active Directory
- LDAP username: eg: Test\Administrator
- LDAP server URL: eg: ldap://testserver2016.test.local:389
- Context names: here, the OU means the accounts you want to use belonged to, eg: OU=XXX,DC=test,DC=local
use LDAP Browser to find a certain OU(build it and search a certain account name to find its upper OU): https://www.ldapadministrator.com/resources/english/help/la20121/ch08s01.html
to list and get the node manager service infromation:
go to cmd:
C:\tibco\tss\10.3.9\tomcat\spotfire-bin>config list-service-configs
to delete the node manager service:
C:\tibco\tss\10.3.9\tomcat\spotfire-bin>config delete-service-config --config-name=servicename
in default communication configuration between AP server and nodemanager server, the port 9443 is for https implement communication, and 9080 is the base layer for http
if using oracle pdb‘s instance:
in batch file:
the instance name should be: //localhost/orclpdb
and when import the dump file, you need to put it into the random folder it made, like app/oracle/admin/orcl/dpdump/F2BBAEADB6274F34AFBAEC1772546E79
for JA16SJISTILDE, need to having the driver of orai18n.jar
The module for installation is in the path, such as the Visual C++ installer:
C:\Program Files(x86)\TIBCO\Spotfire\10.3.3\Modules\Lead Discovery_8.3.0.410\VCRedist
Default Firewall Settings:
in spotfire server:
open for human users: 80
open for nodemanager(backend):9080(for http), 9443(for https)
in nodemanager server:
open for spotfire server: 9081,9444
open for webplayer: 9501
* open for chemdraw: 81
Cannot open information link bug will happen if in UIconfig, data source template has the same name:
eg:《jdbc-type-setting》《type-name》XXX《/type-name》, XXX should not be the same.
method to change content in uiconfig by command:
1. output the saved state:
uiconfig->Export configuration from database->Load configuration from files
2. edit the xml files and import it.
eg: go to spotfire-bin directory, and use command: config import-config config.xml –comment=”disable postgreSQL”
Port 9005 will be used by spotfire, if it cannot be used, the service will stop automatically.
export library by command(default domain is SPOTFIRE):https://docs.tibco.com/pub/spotfire_server/10.10.4/doc/html/TIB_sfire_server_tsas_admin_help/server/topics/export-library-content.html
eg:
config export-library-content --tool-password=pw --file-path=C:/outputfilename --item-type=all_items --user=spotfire@SPOTFIRE --include-access-rights=true --library-path="/Test for case have space"
import library by command eg:
config import-library-content --tool-password=pw --file-path="C:/outputfilename.part0.zip" --item-type=all_items --user=spotfire@SPOTFIRE --conflict-resolution-mode=KEEP_NEW --include-access-rights=true --library-path="/"
change the nodemanager domain information in:
tibco\tsnm\10.3.9\nm\config\nodemanager.properties
change the nodemanager’s instances domain information in:
tibco\tsnm\10.3.9\nm\config\config.json
change domain information for the spotfire server is required change the information in:
app\oracle\product\19.3.0\dbhome_1\network\admin\listener.ora
and
app\oracle\product\19.3.0\dbhome_1\network\admin\tnsnames.ora
and then restart the oracle service: OracleOraDB19Home1TNSListener,OracleServiceORCL
how to check the end users’ using webplayer frequent:
\tibco\tsnm\7.11.7\nm\logs\AuditLog
trust all scripts, template, data functions:
config find-analysis-scripts -t spotfire -s true -d true -q true --single-threaded
to make the spotfire webconsole page in https, you need ssl certificate, the example to make the .jks file is:
C:\tibco\tss\10.10.4\jdk\bin>keytool -genkey -alias servername -keyalg RSA -keypass pw -storepass pw -keystore keystore.jks
then move this jks file to C:\tibco\tss\10.10.4\tomcat\certs
Stop the server service, then edit C:\tibco\tss\10.10.4\tomcat\conf\server.xml, hide the http block, recover the https block, change information like:
    <Certificate certificateKeystoreFile="./certs/keystore.jks"
                 certificateKeystorePassword="pw"
                 certificateKeystoreType="jks"/>
must delete the content below!
truststoreFile=”./certs/testserver2016.jks”
truststorePass=”changeit”
truststoreType=”jks”
at last restart the server service.
change to be DNS:
config switch-domain-name-style –tool-password=pw –new-domain-name-style=dns
How to make Kerberos Authentication:
AD User and Computer:
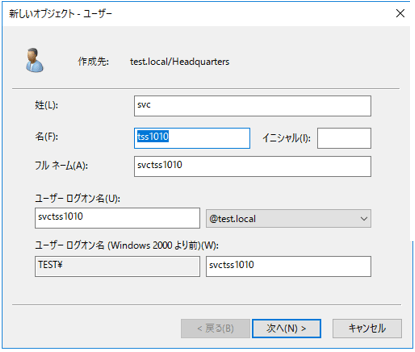
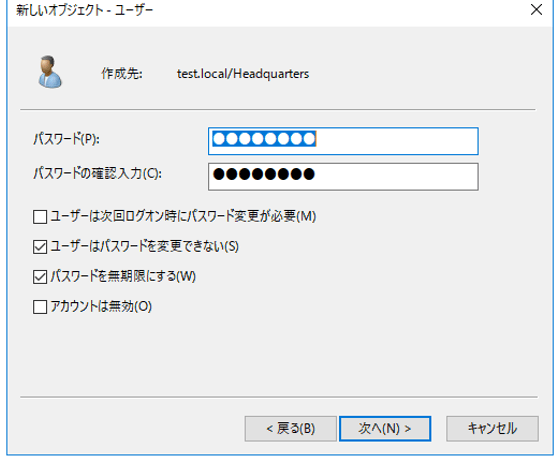
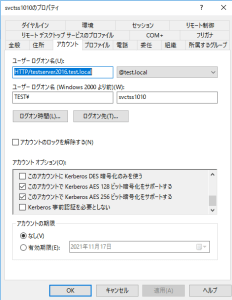
C:\Users\Administrator>setspn -S HTTP/testserver2016 svctss1010
C:\Users\Administrator>setspn -S HTTP/testserver2016.test.local svctss1010
C:\Users\Administrator>setspn -l svctss1010
C:\Users\Administrator>ktpass /princ HTTP/testserver2016.test.local@TEST.LOCAL /ptype krb5_nt_principal /crypto ALL /mapuser svctss1010 /out spotfire.keytab -kvno 0 /pass yourpassword
Paste spotfire.keytab to C:\tibco\tss\10.10.4\tomcat\spotfire-config
Edit C:\tibco\tss\10.10.4\tomcat\spotfire-config\krb5.conf as follows:
[libdefaults]
default_realm = TEST.LOCAL
default_keytab_name = spotfire.keytab
default_tkt_enctypes = aes256-cts-hmac-sha1-96 aes128-cts rc4-hmac
default_tgs_enctypes = aes256-cts-hmac-sha1-96 aes128-cts rc4-hmac
forwardable = true
[realms]
TEST.LOCAL = {
kdc = testserver2016.test.local
admin_server = testserver2016.test.local
default_domain = test.local
}
[domain_realm]
.test.local = TEST.LOCAL
test.local = TEST.LOCAL
[appdefaults]
autologin = true
forward = true
forwardable = true
encrypt = true
C:\tibco\tss\10.10.4\jdk\bin>kinit.exe -k -t C:\tibco\tss\10.10.4\tomcat\spotfire-config\spotfire.keytab HTTP/testserver2016.test.local@TEST.LOCAL
Then delete the generated ticket for security reason.
In spotfire UIConfig, change the Authentication be Kerberos.
Then changes Domain Tab, Domain name style to be DNS, Parse user and domain name to be Yes.
C:\tibco\tss\10.10.4\tomcat\spotfire-bin>config switch-domain-name-style –tool-password=UIconfigpassword –new-domain-name-style=dns
Make sure Post Authentication Filter to be Block.
In Authentication:Kerberos Tab,
Service principal name to be:HTTP/testserver2016.test.local@TEST.LOCAL
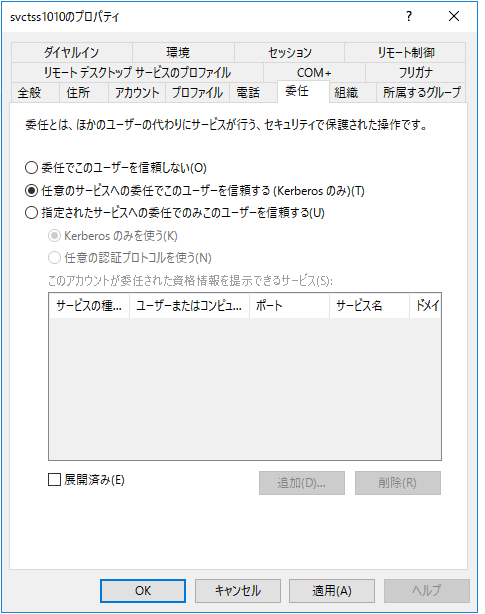
Choose Keytab file and configuration file, Delegation policy Never, if the nodemanger and spotfire server in the same server.
Then save the change in uiconfig.
In client side, IE properties, add in the server site into local intranet site,
click customized level, at the lase choose only automatically login in intranet,
in detail setting tab, make sure you checked use Windows authentication.
restart the spotfire service, now you should login without input password.
synchronize ldap group information without reboot the server service:
spotfire-bin>config list-users -f
Error when running Information links using On-Demand with more than 1000 values in TIBCO Spotfire version 11.4.0/11.4.1/10.10.5/10.10.6
Opening multiple TIBCO Spotfire Analyst client sessions on the same machine causes the previous Analyst session to ask for login prompt:
to refresh the AD information and shown in spotfire(no need to restart the spotfire service):
https://support.tibco.com/s/article/Tibco-KnowledgeArticle-Article-42505
config.bat list-users -f
communicate between Spotfire Server and Node Manager without going through a proxy, you need to refresh the configure file for web player, append the red part, and grey is optional:
 <system.net>

       <defaultProxy enabled="true">

        <bypasslist>

            <add address="Service IP, like web Player, Python Service, etc." />

        </bypasslist>

        <proxy bypassonlocal="true" proxyaddress="Proxy Server IP" />

       </defaultProxy>

     </system.net>
Configure Authentication Windows NT:
Authentication: BASIC Windows NT
User directory: Windows NT
Add Domains name, eg: test
Wildcard domain: Yes
Sleep time (minutes): 60
Domain name style: NetBIOS(e.g.RESEARCH)
Collapse domains: No
Parse user and domain name: Yes
Default domain: test
Creating the Spotfire SPK for Other Spotfire Analyst users
create the R package spk file for spotfire analyst(multcomp, foreign R package example):
library(SpotfireSPK)
install.packages(c("multcomp","foreign"))
writeLines("Packages: multcomp,foreign", "MySpotfireSPK1.dcf")
buildSPK("MySpotfireSPK1.dcf", "MySpotfireSPK1.spk")
cat(readLines("MySpotfireSPK1.dcf"), sep="\n")
export a certain config of webplayer:
\spotfire-bin>config export-service-config --config-name=webconfig2
export the active server configuration(configuration.xml):
config export-config --tool-passrod=yourPassword
import and activate the server configuration(configuration.xml):
config import-config --tool-password=yourPassword --comment=anyComment
command help, eg: config help import-config
preventing administrators from adding local users when using LDAP:
config set-config-prop --name=user-directory.allow-database-user-creation --value=false
export the config by the name: eg:
\tomcat\spotfire-bin>config export-service-config --config-name=webconfig2
Enabling the SSL connector on Spotfire Server
show login interface: Spotfire.Dxp.exe /forceshowlogindialog
open library version control:
config.bat  export-config --force -t yourPassword
config set-config-prop --name=library.versioning.enabled --value=true
config import-config -c "library-version" -t yourPassword
disable the check of the certs for Mods:
config.bat  export-config --force -t yourPassword
config set-config-prop --name=security.code-trust.validate-uploaded-cert --value=false
config import-config -c "trust-modes" -t yourPassword
search the files by size in library: content_size:>2MB
